WHAT TO DO IN EMERGENCIES
CONTENTS
Hazard Warning Flasher 210
If Your Engine Overheats 210
Changing A Flat Tire 211
Tool Kit Location 211
Jack Location 211
Spare Tire Location 213
Tire Changing Procedures 213
I Jump Starting 216
I Towing A Disabled Vehicle 219
210 WHAT TO DO IN EMERGENCIES
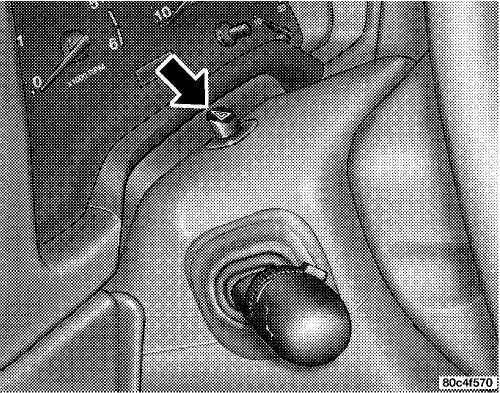
HAZARD WARNING FLASHER
The flasher switch is on top of the steering column, just behind the steering wheel. Depress the switch and both cluster indicators and all front and rear directional signals will flash. Depress the switch again to turn Hazard Warning Flashers off.
Do not use this emergency warning system when the vehicle is in motion. Use it when your vehicle is disabled and is creating a safety hazard for other motorists.
If it is necessary to leave the vehicle to go for service, the flasher system will continue to operate with the ignition key removed and the vehicle locked.
NOTE: With extended use, the flasher may wear down your battery.
IF YOUR ENGINE OVERHEATS
In any of the following situations, you can reduce the potential for overheating by taking the appropriate action.
On the highways — Slow down.
In city traffic — While stopped, put transmission in N
(Neutral), but do not increase engine idle speed.
NOTE: There are steps that you can take to slow down an impending overheat condition. If your air conditioner is on, turn it off. The air conditioning system adds heat to the engine cooling system and turning off the A/C removes this heat. You can also turn the Temperature
WHAT TO DO IN EMERGENCIES 211

 Control to maximum heat, the Mode Control to floor, and the Fan Control to High. This allows the heater core to act as a supplement to the radiator and aids in removing heat from the engine cooling system.
 CAUTION!
Driving with a hot cooling system could damage your vehicle. If the temperature gauge reads "H", pull over and stop the vehicle. Idle the vehicle with the air conditioner turned off until the pointer drops back into the normal range. If the pointer remains on the "H", and you hear continuous chimes, turn the engine off immediately, and call for service.
CHANGING A FLAT TIRE
Tool Kit Location
The jack handle driver and jack extension are located in a kit that is stored on the floor board to the right of the front passenger seat. On some models, this tool kit is under the carpeting in the same location.
Jack Location
The jack and lug wrench are stored under the front passenger seat.
212 WHAT TO DO IN EMERGENCIES


 To remove the jack from its stowage position, carefully release the rubber strap from the bracket. Turn the thumb screw counterclockwise to loosen jack and then remove it from the bracket.
WARNING!
Always store the jack, lug wrench, jack handle driver, jack extension, and spare, flat or damaged tire securely in the proper place. Never leave them loose in the vehicle where they could become dangerous projectiles during a quick stop or collision.
WARNING!
The jack is designed to use as a tool for changing tires only. The jack should not be used to lift the vehicle for service purposes, unless suitable supports are placed under the vehicle as a safety measure. The vehicle should be jacked on a firm level surface only. Avoid ice or slippery areas.
CAUTION!
Never use your vehicle jack on the bumpers, sills or underbody of your vehicle. Damage may result. Place your vehicle jack only under an axle and in the positions shown for "Tire Changing Procedures."
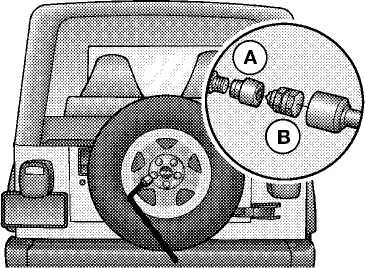
Spare Tire Location
To remove the spare tire from the carrier, remove the tire cover, if equipped, and remove the lug nuts with the lug wrench turning them counterclockwise. If equipped with an anti-theft lug nut (A), use the "Key" (B) and the lug wrench. The "Key" is stored in the glove box.
^Ř WHAT TO DO IN EMERGENCIES 213
Tire Changing Procedures
WARNING!
You can be injured or killed if you try to change a wheel too close to moving traffic. Pull far enough off the road to avoid being hit when operating the jack or changing the wheel.
Preparation
• Park on a firm, level surface well off the road, to provide ample work space. Place automatic transmission in P (Park), or manual transmission in R (Reverse), and stop engine. Set parking brake firmly and activate hazard warning flasher.
NOTE: If you have added aftermarket accessories to the spare tire mounted carrier, it cannot exceed a gross weight of 50 lbs (23 kg) including the weight of the spare tire.
214 WHAT TO DO IN EMERGENCIES
Get everyone out of the vehicle before you jack it up. If the jack should fall, someone in the vehicle could be hurt.
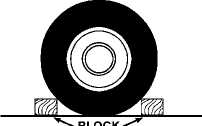
Block tire diagonally opposite tire to be changed to prevent forward and backward vehicle movement.
Instructions
Remove spare tire, jack and tools from stored location.
Before raising vehicle, loosen lug nuts on wheel with
flat tire.
Assemble the jack and jacking tools as shown. Connect
jack handle driver (1) to extension (2) then to lug wrench
(3).
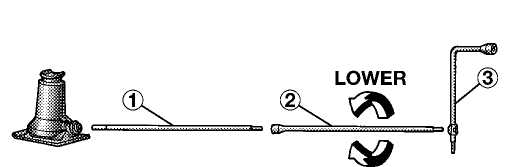
RAISE
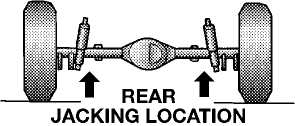
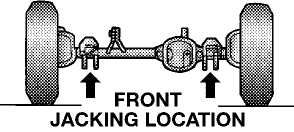
4. Operate jack from the front or the rear of the vehicle. Place the jack under the axle tube, as shown.
WHAT TO DO IN EMERGENCIES 215
Use a clockwise rotation to raise the jack. Raise vehicle
just enough to be able to remove flat tire and install spare
tire.
Remove lug nuts and wheel.
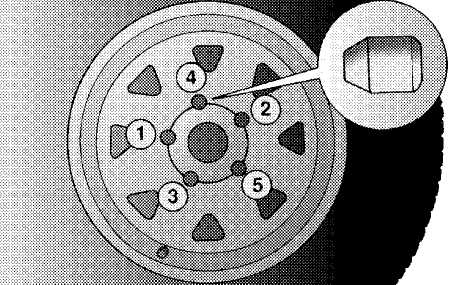
Position spare wheel/tire on vehicle and install lug
nuts with cone-shaped end toward wheel. Lightly tighten
nuts clockwise. To avoid the risk of forcing the vehicle off
the jack, do not tighten the nuts fully until the vehicle has
been lowered.
Lower the vehicle by using a counterclockwise rota
tion to lower the jack.
Finish tightening the lug nuts securely in crisscross
pattern as shown. Tighten to 85-110 ft. lbs. (115-149 N-m).
Remove jack assembly and wheel blocks.
Secure jack, lug wrench, jack handle driver, jack
extension, and tire in proper locations.
 WARNING!
Carefully follow these tire changing warnings to help prevent personal injury or damage to your vehicle:
216 WHAT TO DO IN EMERGENCIES
 Always park on a firm, level surface as far from the
edge of the roadway as possible before raising the
vehicle.
Apply the parking brake firmly before jacking.
Always block the wheel diagonally opposite the wheel
being raised.
Do not raise the vehicle higher than is necessary to
remove the tire.
Never start the engine with the vehicle on a jack.
Do not let passengers sit in the vehicle when it is on a
jack.
Do not get under the vehicle when it is on a jack.
Failure to follow the "Tire Changing Procedure" may
result in personal injury or damage to your vehicle.
Only use the jack in the positions indicated.
JUMP STARTING
WARNING!
To prevent personal injury or damage to clothing, do not allow battery fluid to contact eyes, skin, or fabrics. Do not lean over a battery when connecting jumper cables or allow cable clamps to touch each other. Keep open flames or sparks away from battery vent holes. Always wear eye protection when working with batteries. Do not use a booster battery or any other booster source that has a greater than 12-volt system, i.e. do not use a 24-volt power source.
Your vehicle is equipped with a 12-volt battery. If it becomes necessary to use a booster battery, with jumper cables, to start the vehicle’s engine because it’s battery is discharged, the following procedure should be followed:
WHAT TO DO IN EMERGENCIES 217

>:801e66ccS It]
CAUTION!
Use the "Jump Starting" procedure only when the charge indicator is dark in the center. Do not attempt jump starting when the battery charge indicator is bright or yellow. If the charge indicator is dark and has a green dot in the center, failure to start is not due to a discharged battery and the cranking system should be checked.
1. Attach one end of the jumper cable to the positive terminal of the discharged battery and the other end of the same cable to the positive terminal of the booster battery.
WARNING!
Do not permit vehicles to touch each other as this could establish a ground connection and personal injury could result.
2. Connect one end of the other jumper cable to the negative terminal of the booster battery. Connect the other end of the jumper cable to a good ground on the vehicle with the discharged battery. Make sure a good connection is made, free of dirt and grease.
218 WHAT TO DO IN EMERGENCIES

 WARNING!
Do not connect the cable to the negative terminal of the discharged battery. The resulting electrical spark could cause the battery to explode.
During cold weather when temperatures are below freezing point, electrolyte in a discharged battery may freeze. Do not attempt jump starting because the battery could rupture or explode. The battery temperature must be brought up above freezing point before attempting to jump start.
4. After the engine is started or if the engine fails to start, the cables must be disconnected in the following order:
a. Disconnect the negative cable at the engine
ground.
b. Disconnect the negative cable at the negative
terminal on the booster battery.
ń Disconnect the cable from the positive terminals of both batteries.
 WARNING!
3. Take care that the clamps from one cable do not touch clamps from the other cable. Do not lean over the battery when making the connection. The negative connection must provide good electrical conductivity and current carrying capacity.
Any procedure other than above could result in:
Personal injury caused by electrolyte squirting
out the battery vent.
Personal injury or property damage due to battery
explosion.
Damage to charging system of booster vehicle or
of immobilized vehicle.
TOWING A DISABLED VEHICLE
The manufacturer recommends towing with all four wheels off the ground. Acceptable methods are to tow the vehicle on a flatbed or with one end of the vehicle raised and the other end on a towing dolly.
WHAT TO DO IN EMERGENCIES 219