THINGS TO KNOW BEFORE STARTING YOUR VEHICLE 31
The belt-positioning booster seat is for children weighing more than 40 lbs (18 kg), but who are still too small to fit in the vehicle’s seat belts properly. If the child cannot sit with knees bent over the seat cushion while the child’s back is against the seat back, they should use a belt-positioning booster seat. The child and booster seat are held in the vehicle by lap/shoulder belt. (Some booster seats are equipped with a front shield and are held in the vehicle by the lap portion or lap belt.)
information, refer
to
• For additional www.seatcheck.org.
WARNING!
Improper
installation can lead to failure of an
infant or child
restraint. It could come loose in a
collision. The child could
be badly injured or
killed. Follow the manufacturer’s directions
ex
actly when installing an infant or child restraint.
A rearward facing infant restraint should
only be
used in a rear seat unless the passenger frontal
airbag
is turned off. If the airbag is left on, a
rearward facing
infant restraint in the front seat
may be struck by a deploying
passenger airbag
which may cause severe or fatal injury to
the
infant.
32 THINGS TO KNOW BEFORE STARTING YOUR VEHICLE
Here are some tips on getting the most out of your child restraint:
Before
buying any restraint system, make sure that it
has a label
certifying that it meets all applicable Safety
Standards. The
manufacturer also recommends that
you make sure that you can
install the child restraint in
the vehicle where you will use it
before you buy it.
The
restraint must be appropriate for your child’s
weight and
height. Check the label on the restraint for
weight and height
limits.
Carefully
follow the instructions that come with the
restraint. If you
install the restraint improperly, it may
not work when you need
it.
The
passenger seat belts are equipped with cinching
latch plates
designed to keep the lap portion or lap belt
tight around the
child restraint so that it is not
necessary to use a locking
clip. Pull up on the shoulder
portion of the lap/shoulder belt,
or on the free end of
the lap belt to tighten the belt. The
cinching latch plate
will keep the belt tight, however, any seat
belt system
will loosen with time, so check the belt
occasionally
and pull it tight if necessary.
In the rear seat, you may have trouble tightening the lap belt or lap/shoulder belt on the child restraint because the buckle or latch plate is too close to the belt path opening on the restraint. Disconnect the latch plate from the buckle and twist the short buckle-end belt several times to shorten it. Insert the latch plate into the buckle with the release button facing out.
If the belt still cannot be tightened, or if pulling and pushing on the restraint loosens the belt, disconnect the latch plate from the buckle, turn the buckle around, and insert the latch plate into the buckle again. If you still cannot make the child restraint secure, try a different seating position.
Buckle the child into the seat according to the child restraint manufacturer’s instructions.
When your child restraint is not in use, secure it with the seat belt or remove it from the vehicle. Do not leave it loose in the vehicle. In a sudden stop or collision, it could strike the occupants or seat backs and cause serious personal injury.
THINGS TO KNOW BEFORE STARTING YOUR VEHICLE 33
LATCH
— Child
Seat Anchorage System (Lower
Anchors
and Tether for CH ildren) ~~
 Your
vehicle’s front passenger and two rear outboard (if equipped)
seating positions are equipped with the child restraint anchorage
system called LATCH. The LATCH system provides for the installation
of the child restraint without using the vehicle’s seat belts,
instead securing the child restraint using lower anchorages and
upper tether straps from the child restraint to the vehicle
structure.
Your
vehicle’s front passenger and two rear outboard (if equipped)
seating positions are equipped with the child restraint anchorage
system called LATCH. The LATCH system provides for the installation
of the child restraint without using the vehicle’s seat belts,
instead securing the child restraint using lower anchorages and
upper tether straps from the child restraint to the vehicle
structure.
LATCH-compatible child restraint systems are now available. However, because the lower anchorages are to be introduced over a period of years, child restraint systems having attachments for those anchorages will continue to also have features for installation using the vehicle’s seat belts. Child restraints having tether straps and hooks for connection to the top tether anchorages have been available for some time. For some older child restraints, many child restraint manufacturers offer add-on tether strap kits or retro-fit kits. You are urged to take advantage of all the available attachments provided with your child restraint in any vehicle.
The two rear outboard seating positions have lower anchorages that are capable of accommodating LATCH-compatible child seats having flexible, webbing-mounted lower attachments. Child seats with fixed lower attachments must be installed in the outboard positions only. Regardless of the specific type of lower attachment, NEVER install LATCH-compatible child seats such that two seats share a common lower anchorage. If installing child seats in adjacent rear-seating positions or if your child restraints are not LATCH-compatible, install the restraints using the vehicle’s seat belts.
Installing the LATCH-Compatible Child Restraint System
We urge that you carefully follow the directions of the manufacturer when installing your child restraint. Not all child restraint systems will be installed as described here. Again, carefully follow the installation instructions that were provided with the child restraint system.
34 THINGS TO KNOW BEFORE STARTING YOUR VEHICLE
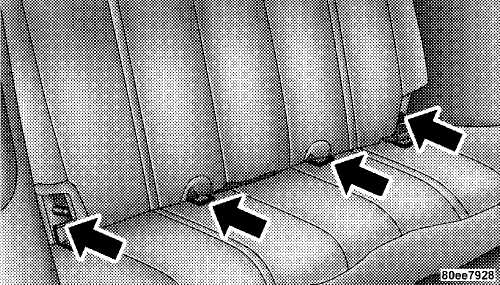
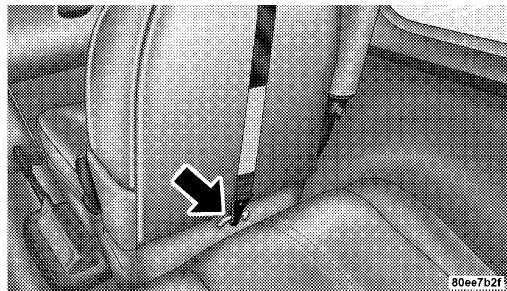
The
front passenger and rear seat lower anchorages are round bars,
located at the rear of the seat cushion where it meets the seat
back, and are just visible when you lean into the rear seat to
install the child restraint. You will easily feel them if you run
your finger along the intersection of the seatback and seat
cushion surfaces.
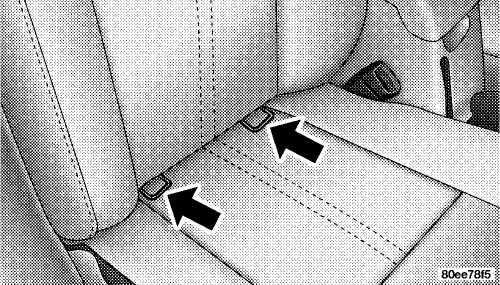
Rear Seat Latch Anchors
Front Seat Latch Anchors
THINGS TO KNOW BEFORE STARTING YOUR VEHICLE 35
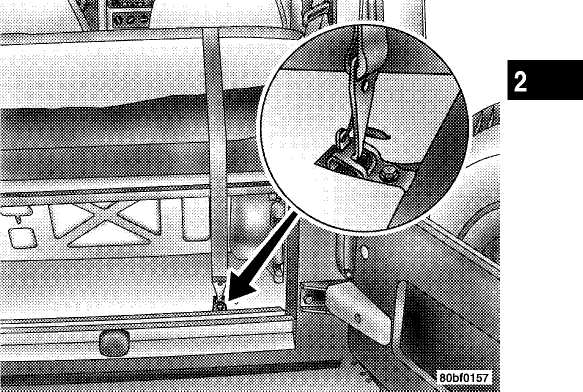
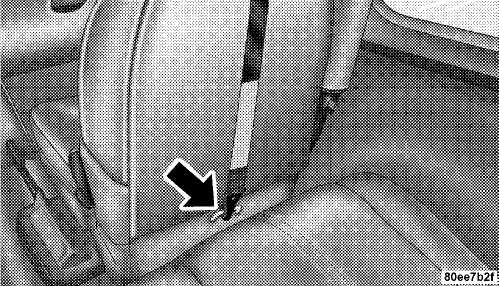
Front Seat Tether
Rear Seat Tether Anchor
36 THINGS TO KNOW BEFORE STARTING YOUR VEHICLE
Many, but not all restraint systems will be equipped with separate straps on each side, with each having a hook or connector for attachment to the lower anchorage and a means of adjusting the tension in the strap. Forward-facing toddler restraints and some rear-facing infant restraints will also be equipped with a tether strap, a hook for attachment to the tether strap anchorage and a means of adjusting the tension of the strap.
You will first loosen the adjusters on the lower straps and on the tether strap so that you can more easily attach the hooks or connectors to the vehicle anchorages. Next attach the lower hooks or connectors over the top of the anchorage bars, pushing aside the seat cover material. Then lift the tether anchorage cover directly behind the seat where you are placing the child restraint and attach the tether strap to the anchorage, being careful to route the tether strap to provide the most direct path between the anchor and the child restraint. If the Add-A-Trunk™ option is present in the vehicle, the lid should be opened and positioned against the back of the rear seat prior to attaching and adjusting the strap. Finally, tighten all three straps as you push the child restraint rearward and
downward into the seat, removing slack in the straps according to the child restraint manufacturer’s instructions.
WARNING!
Improper installation of a child restraint to the LATCH anchorages can lead to failure of an infant or child restraint. The child could be badly injured or killed. Follow the manufacturer’s directions exactly when installing an infant or child restraint.
Installing Child Restraints Using the Vehicle Seat Belt
The passenger seat belts are equipped with cinching latch plates, which are designed to keep the lap portion tight around the child restraint so that it is not necessary to use a locking clip. Pull up on the shoulder portion of the lap/shoulder belt to tighten the belt. The cinching latch plate will keep the belt tight, however, any seat belt system will loosen with time, so check the belt occasionally and pull it tight if necessary.
THINGS TO KNOW BEFORE STARTING YOUR VEHICLE 37
In the rear seat, you may have trouble tightening the lap/shoulder belt on the child restraint because the buckle or latch plate is too close to the belt path opening on the restraint. Disconnect the latch plate from the buckle and twist the short buckle-end belt several times to shorten it. Insert the latch plate into the buckle with the release button facing out.
If the belt still cannot be tightened, or if by pulling and pushing on the restraint loosens the belt, you may need to do something more. Disconnect the latch plate from the buckle, turn the buckle around, and insert the latch plate into the buckle again. If you still can’t make the child restraint secure, try a different seating position.
To attach a child restraint tether strap:
Route the tether strap over the front passenger seat back and attach the hook to the tether anchor located on the back of the seat. For the rear outboard seating positions, route the tether over the rear seat and attach to the rear floor tether anchors. If the Add-A-Trunk™ option is present in the vehicle, the lid should be opened and positioned against the back of the rear seat prior to attaching and adjusting the strap.
Front Seat Tether
38 THINGS TO KNOW BEFORE STARTING YOUR VEHICLE
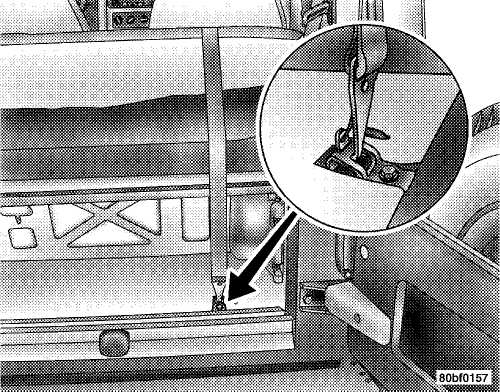
Rear
Seat Tether Anchor
WARNING!
An incorrectly anchored tether strap could lead to increased head motion and possible injury to the child. Use only the anchor positions directly behind the child seat to secure a child restraint top tether strap.
Children Too Large for Booster Seats
Children who are large enough to wear the shoulder belt comfortably, and whose legs are long enough to bend over the front of the seat when their back is against the seat back should use the lap/shoulder belt in a rear seat.
Make sure that the child is seated upright in the seat.
The lap
belt portion should be low on the hips and as
snug as possible.
Check
belt fit periodically. A child’s squirming or
slouching can move
the belt out of position.
THINGS TO KNOW BEFORE STARTING YOUR VEHICLE 39
• If the shoulder belt contacts the child’s face or neck, move the child closer to the center of the vehicle. Never allow a child to put the shoulder belt under an arm or behind their back.
Transporting Pets
Airbags deploying in the front seat could harm your pet. An unrestrained pet will be thrown about and possibly injured, or injure a passenger during panic braking or in a collision.
Pets should be restrained in the rear seat in pet harnesses or pet carriers that are secured by seat belts.
ENGINE BREAK-IN RECOMMENDATIONS
A long break-in period is not required for the engine in your new vehicle.
Drive moderately during the first 300 miles (500 km). After the initial 60 miles (100 km), speeds up to 50 or 55 mph (80 or 90 km/h) are desirable.
While cruising, brief full-throttle acceleration, within the limits of local traffic laws, contributes to a good break-in. Wide open throttle acceleration in low gear can be detrimental and should be avoided.
The engine oil installed in the engine at the factory is a high quality energy conserving type lubricant. Oil changes should be consistent with anticipated climate conditions under which vehicle operations will occur. The recommended viscosity and quality grades are shown in Section 7 of this manual. NON-DETERGENT OR STRAIGHT MINERAL OILS MUST NEVER BE USED.
40 THINGS TO KNOW BEFORE STARTING YOUR VEHICLE
A new engine may consume some oil during its first few thousand miles (kilometers) of operation. This should be considered as a normal part of the break-in and not interpreted as an indication of difficulty.
SAFETY TIPS Exhaust Gas
WARNING!
Exhaust gases can injure or kill. They contain carbon monoxide (CO) which is colorless and odorless. Breathing it can make you unconscious and can eventually poison you. To avoid breathing (CO) follow the safety tips below.
Do not inhale exhaust gases. They contain carbon monoxide, a colorless and odorless gas which can kill. Never run the engine in a closed area, such as a garage, and never sit in a parked vehicle with the engine running for a extended period. If the vehicle is
stopped in an open area with engine running for more than a short period, adjust the ventilation system to force fresh, outside air into the vehicle.
Guard against carbon monoxide with proper maintenance. Have the exhaust system inspected every time the vehicle is raised. Have any abnormal conditions repaired promptly. Until repaired, drive with all side windows fully open.
Always run the climate control in panel or floor mode when driving with any windows open, even if only slightly, to help keep fresh air circulating inside vehicle. Otherwise poisonous gases could be drawn into the vehicle.
On hardtop models, keep the tailgate window closed when driving your vehicle. On fabric top models, do not drive with the rear window curtain up unless the side curtains are also open. This will prevent carbon monoxide and other poisonous exhaust gases from entering the vehicle.
THINGS TO KNOW BEFORE STARTING YOUR VEHICLE 41
Safety Checks You Should Make Inside The Vehicle
Seat Belts
Inspect the belt system periodically, checking for cuts, frays and loose parts. Damaged parts must be replaced immediately. Do not disassemble or modify the system.
Seat belt assemblies must be replaced after an accident if they have been damaged (bent retractor, torn webbing, etc.). If there is any question regarding belt or retractor condition, replace the belt.
Airbag Warning Light
The light should come on and remain on for 6 to 8 seconds as a indicator check when the ignition switch is first turned on. If the indicator is not lit during starting, have it serviced. If the light stays on or comes on while driving, have the system checked by an authorized dealer.
Defrosters
Check operation by selecting the defrost mode and place the blower control on high speed. You should feel the air directed against the windshield.
Safety Checks You Should Make Outside The Vehicle
Tires
Examine tires for excessive tread wear or uneven wear patterns. Check for stones, nails, glass, or other objects lodged in the tread. Inspect for tread cuts or sidewall cracks. Check wheel nuts for tightness and tires (including spare) for proper pressure.
Lights
Have someone observe the operation of all exterior lights while you work the controls. Check turn signal and high beam indicator lights on the instrument panel.
Fluid Leaks
Check area under vehicle after overnight parking for fuel, coolant, oil, or other fluid leaks. Also, if gasoline fumes are detected, the cause should be located and corrected immediately.