STARTING AND OPERATING
Clutch
Interlocking Ignition System
Manual transmission vehicles are equipped with a clutch interlock safety feature. With this feature engaged, you must depress the clutch pedal to allow cranking of the engine. To temporarily bypass this safety feature while off-road driving, which will allow cranking the engine without depressing the clutch, follow these steps:
Locate
the instrument panel fuseblock behind the
glove compartment.
Put
a 20 Amp fuse (optional) in the fuseblock
cavity
(f20) marked as Transmission.
NOTE: A fuse is provided in fuseblock cavity (f19) marked as Spare.
3. Be
sure to re-engage the clutch interlock safety feature
by
following these steps in reverse order when you are
finished
off-road driving.
Automatic Transmission
Shifting from D (Drive) to P (Park) or R (Reverse) (or from P or R to D) should be done only after the accelerator pedal is released and the vehicle is stopped. Be sure to keep your foot on the brake when moving the shift lever between these gears.
STARTING AND OPERATING
WARNING!
 It
is dangerous to shift the selector lever out of "P" or "N"
if the engine speed is higher than idle speed. If your foot is not
firmly on the brake pedal, the vehicle could accelerate quickly
forward or in reverse. You could lose control of the vehicle
and hit someone or something. Only shift into gear when the engine
is idling normally and when your right foot is firmly on the brake
pedal.
It
is dangerous to shift the selector lever out of "P" or "N"
if the engine speed is higher than idle speed. If your foot is not
firmly on the brake pedal, the vehicle could accelerate quickly
forward or in reverse. You could lose control of the vehicle
and hit someone or something. Only shift into gear when the engine
is idling normally and when your right foot is firmly on the brake
pedal.
Gear Ranges
P (Park)
Supplements the parking brake by locking the transmission. The engine can be started in this range. Never use P (Park) while the vehicle is in motion. Apply the parking brake when leaving the vehicle in this range. Always apply the parking brake first, and then place the selector in P (Park) position.
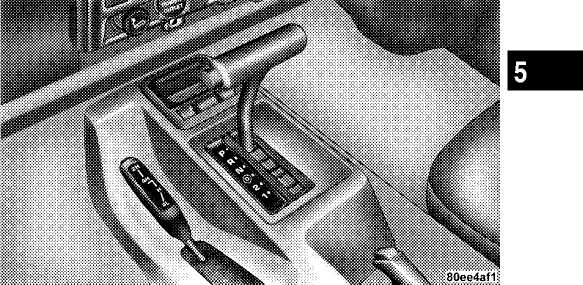
Brake Transmission Shift Interlock System
This vehicle is equipped with a brake transmission shift interlock system (BTSI) that holds the gearshift lever in the P (Park) position when the ignition switch is in the OFF position. To move the gear selector lever out of the P (Park) position, the ignition switch must be turned to the ON position, the brake pedal and the button on the front of the shifter handle must be depressed.
STARTING AND OPERATING 167
WARNING!
Unintended movement of a vehicle could injure those in and near the vehicle. As with all vehicles, you should never exit a vehicle while the engine is running. Before exiting a vehicle, you should always shift the vehicle into P (Park), remove the key from the ignition, and apply the parking brake. Once the key is removed from the ignition, the transmission shift lever is locked in the P (Park) position, securing the vehicle against unwanted movement. Furthermore, you should never leave children unattended inside a vehicle.
The following indicators should be used to ensure that you have engaged the transmission shift lever into the P (Park) position:
When shifting into P (Park), depress the
button on the
shift lever and firmly move the lever all the
way
forward until it stops.
Look at the shift indicator window on the
console to
ensure it is in the P (Park) position.
When engaged in P (Park), you will not be able to move the shifter rearward without depressing the shift lever button.
CAUTION!
Before
moving the shift lever out of P (Park), you must turn the ignition
from LOCK to ON so the steering wheel and shift lever are released.
Otherwise, damage to the steering column or shifter could
result.
R
(Reverse)
For moving the vehicle rearward. Always stop before moving the lever to R (Reverse), except when rocking the vehicle.
N (Neutral)
Engine may be started in this position.
168 STARTING AND OPERATING
WARNING!
Do not coast in N (Neutral) and never turn off the ignition to coast down a hill. These are unsafe practices that limit your response to changing traffic or road conditions. You might lose control of the vehicle.
Overdrive (O/D)
For most city and highway driving. The transmission contains an electronically controlled Overdrive, and will automatically shift from D (Drive) to O/D (Overdrive) if the following conditions are present:
The transmission selector is in D (Drive).
The O/D OFF switch has not been activated.
Vehicle
speed is above approximately 30 mph
(48
km/h).
When frequent transmission shifting occurs while using Overdrive, such as when operating the vehicle under heavy load conditions (for example, in hilly terrain,
strong head winds, or trailer towing), turning off overdrive will improve performance and extend transmission life by reducing excessive shifting and heat buildup.
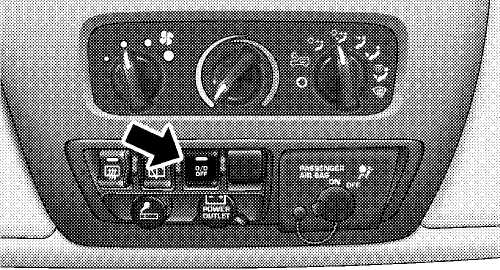
Overdrive can be locked out by pressing the O/D OFF switch located on the instrument panel. The O/D OFF indicator light (on the switch) will illuminate to show that the switch has been activated. When the indicator light is on, Overdrive is locked out. Pressing the switch a second time restores the Overdrive function. The lockout feature is useful when towing a trailer or carrying a heavy load.
STARTING AND OPERATING 169
2 (Second)
For moderate grades and to assist braking on dry pavement or in mud and snow. Begins at a stop in low gear with automatic upshift to 2nd gear. Will not shift to 3rd.
1 (First)
For hard pulling at low speeds in mud, sand, snow, or on steep grades. Begins and stays in low gear with no upshift. Provides engine compression braking at low speeds.
WARNING!
Never use P (Park) position with an automatic transmission as a substitute for the parking brake. Always apply parking brake fully when parked to guard against vehicle movement and possible injury or damage.
CAUTION!
Before
moving the shift lever out of P (Park), you must turn the ignition
from LOCK so the steering wheel and shift lever are released.
Otherwise, damage to steering column or shifter could result.
Never race the engine with the brakes on and the vehicle in gear, and never hold the vehicle on an incline without applying the brakes. These practices can overheat and damage the transmission.
When "rocking" a stuck vehicle by moving between D (Drive) and R (Reverse), do not spin the wheels faster than 15 mph (24 km/h), or drivetrain damage may result.
170 STARTING AND OPERATING
Torque Converter Clutch
A feature designed to improve fuel economy has been added to the automatic transmission of this vehicle. A clutch within the torque converter engages automatically at calibrated speeds. This may result in a slightly different feeling or response during normal operation in high gear. When the vehicle speed drops or during acceleration, the clutch automatically and smoothly disengages.
FOUR-WHEEL DRIVE OPERATION (COMMAND-TRAC™ OR ROCK-TRAC™) — IF EQUIPPED
Operating Instructions/Precautions
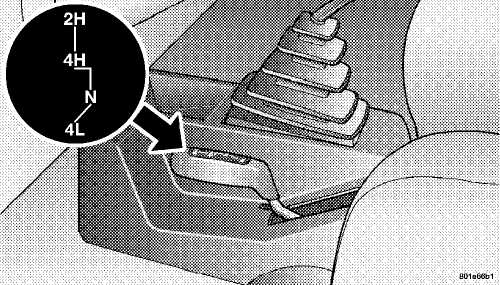
The transfer case provides four mode positions — two (rear) wheel drive high range, four wheel drive high range, neutral, and four wheel drive low range.
This transfer case is intended to be driven in the two wheel drive (2H) position for normal street and highway conditions such as dry hard surfaced roads.
In the events when additional traction is required, the transfer case 4H and 4L positions can be used to lock the front and rear driveshafts together and force the front and rear wheels to rotate at the same speed. This is accomplished by simply moving the shift lever to these positions. The 4H and 4L positions are intended for loose, slippery road surfaces only. Driving in the 4H and 4L positions on dry hard surfaced roads may cause increased tire wear and damage to the driveline components.
The 4WD indicator light, located in the instrument panel, alerts the driver that the vehicle is in four wheel drive and that the front and rear driveshafts are locked together. This light illuminates when the transfer case is shifted to either the 4H or 4L positions.
STARTING AND OPERATING 171
NOTE: Do not attempt to make a shift while only the front or rear wheels are spinning. The transfer case is not equipped with a synchronizer and therefore the front and rear driveshafts speeds must be equal for the shift to take place. Shifting while only the front or rear wheels are spinning can cause damage to the transfer case.
When operating your vehicle in 4L, the engine speed is approximately three times that of the 2H or 4H positions at a given road speed. Take care not to overspeed the engine and do not exceed 25 mph (40 km/h).
Proper operation of four wheel drive vehicles depends on tires of equal size, type, and circumference on each wheel. Any difference will adversely affect shifting and cause damage to the transfer case.
Because four wheel drive provides improved traction, there is a tendency to exceed safe turning and stopping speeds. Do not go faster than road conditions permit.
WARNING!
You
or others could be injured if you leave the vehicle
unattended with the transfer case in the N (Neutral)
position without first fully engaging the parking
brake. The transfer case N (Neutral)
position disengages both the front and
rear driveshafts from the powertrain and
will allow the vehicle to move regardless
of the transmission position. The parking brake
should always be applied when the driver is not
in the vehicle.
Shift Positions
For additional information on the appropriate use of each transfer case mode position, see the information below:
2H Position
Rear Wheel Drive High Range — Normal street and highway driving. Dry hard surfaced roads.
172 STARTING AND OPERATING
4H Position
Four Wheel Drive High Range — Locks the front and rear driveshafts together. Forces the front and rear wheels to rotate at the same speed. Additional traction for loose, slippery road surfaces.
N (Neutral) Position
Neutral — Disengages both the front and rear driveshafts from the powertrain. To be used for flat towing behind another vehicle. Refer to "Recreational Towing" in Section 5 of this manual.
4L Position
Four Wheel Drive Low Range — Locks the front and rear driveshafts together. Forces the front and rear wheels to rotate at the same speed. Additional traction and maximum pulling power for loose, slippery road surfaces only. Do not exceed 25 mph (40 km/h).
Shifting Procedure
2H to 4H or 4H to 2H
Shifting between 2H and 4H can be made with the vehicle stopped or in motion. If the vehicle is in motion, shifts can be made up to 55 mph (88 km/h). With the vehicle in motion, the transfer case will engage/ disengage faster if you momentarily release the accelerator pedal after completing the shift. Apply a constant force when shifting the transfer case lever.
4H to 4L or 4L to 4H
With the vehicle rolling at 2 to 3 mph (3 to 5 km/h), shift an automatic transmission to N (Neutral) or depress the clutch pedal on a manual transmission. While the vehicle is coasting at 2 to 3 mph (3 to 5 km/h), shift the transfer case lever firmly to the desired position. Do not pause in transfer case N (Neutral).
NOTE: Pausing in transfer case N (Neutral) in vehicles equipped with an automatic transmission may require shutting the engine OFF to avoid gear clash while completing the shift. If difficulty occurs, shift the automatic transmission to N (Neutral), hold foot on brake, and turn the engine OFF. Make shift to desired mode.
STARTING AND OPERATING 173
NOTE: Shifting into or out of 4L is possible with the vehicle completely stopped, however, difficulty may occur due to the mating teeth not being properly aligned. Several attempts may be required for clutch teeth alignment and shift completion to occur. The preferred method is with the vehicle rolling at 2 to 3 mph (3 to 5 km/h). Avoid attempting to engage or disengage 4L with the vehicle moving faster than 2 to 3 mph (3 to 5 km/h).
WARNING!
Failure to engage a position completely can cause transfer case damage or loss of power and vehicle control. You could have an injury accident. Do not drive the vehicle unless the transfer case is fully engaged.
TRAC-LOK™ REAR AXLE
The Trac-Lok™ rear axle provides a constant driving force to both rear wheels and reduces wheel spin caused by the loss of traction at one driving wheel. If traction differs between the two rear wheels, the differential automatically proportions the usable torque by providing more torque to the wheel that has traction.
Trac-Lok™ is especially helpful during slippery driving conditions. With both rear wheels on a slippery surface, a slight application of the accelerator will supply maximum traction. When starting with only one rear wheel on an excessively slippery surface, slight application of the parking brake may be necessary to gain maximum traction.
174 STARTING AND OPERATING

 WARNING!
On vehicles equipped with a limited-slip differential, never run the engine with one rear wheel off the ground. The vehicle may drive through the rear wheel remaining on the ground and cause you to lose control of your vehicle.
AXLE LOCK (TRU-LOK™) — IF EQUIPPED
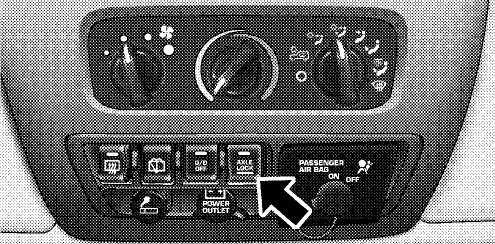
The Axle Locker switch is located on the lower center of the instrument panel. This feature will only activate when the following conditions are met:
Key in ignition, vehicle in 4L (Low) range.
The vehicle must be
traveling at 10 mph (16 km/h)
or
less.
To activate the system, press the switch once to lock the rear axle only (the REAR LOCK indicator light will illuminate), press the switch again to lock the front axle (the FRONT LOCK indicator light will illuminate). Once the rear axle is locked, pressing the switch again will lock or unlock the front axle.
NOTE: The indicator lights will flash until the axles are fully locked or unlocked. A chime will sound three times and the indicator lights will continue to flash at a different rate if the key is removed while the axles are still in the locked position.
To unlock the axles, pull up on the switch.
STARTING AND OPERATING 175
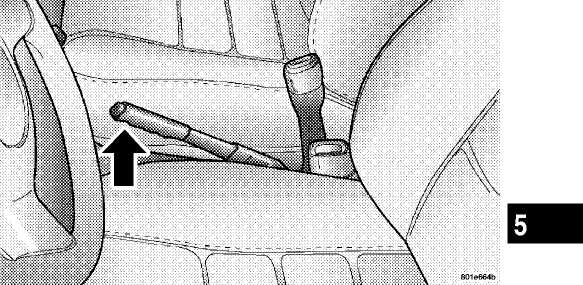
PARKING
BRAKE
To set the parking brake, pull the lever up as firmly as possible. When the parking brake is applied with the ignition ON, the BRAKE warning light in the instrument cluster will light.
NOTE: The BRAKE warning light indicates only that the parking brake is applied. It does not indicate the degree of brake application.
NOTE: If the parking brake is applied and the vehicle is in motion, the BRAKE warning light will flash and a chime will sound.
Before leaving the vehicle parked on a hill, you must make sure the parking brake is fully applied and place the gear selector in the P (Park) position (automatic transmission) or first gear (manual transmission). Make certain the transfer case is in gear. Failure to do so may cause the vehicle to roll and cause damage or injury.
STARTING AND OPERATING
WARNING!
WARNING!
Always fully apply the parking brake when leaving your vehicle, or vehicle may roll and cause damage or injury. Also be certain to leave a automatic transmission in P (Park), or a manual transmission in 1st gear. Make certain the transfer case is in gear. Failure to do so may cause the vehicle to roll and cause damage or injury.
If the parking brake is released, and the BRAKE warning light glows while the ignition switch is ON or the engine is running, there may be a brake system problem. Brake pedal travel, effort and stopping distances may increase, and you should obtain corrective service immediately.
When
parking on a hill, it is important to set the parking brake before
placing the gear selector in P (Park), otherwise the load on
the transmission locking mechanism may make it difficult to move the
selector out of P (Park).
The parking brake should always be applied when the driver is not in the vehicle.
• Leaving children unattended in a vehicle is dangerous for a number of reasons. A child or others could be injured. Children should be warned not to touch the parking brake or the gear selector lever. Don’t leave the keys in the ignition. A child could operate controls or move the vehicle.
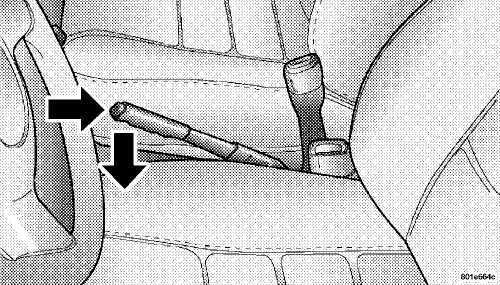
To release the parking brake, pull up slightly, press center button, then lower lever completely.
STARTING AND OPERATING 177
 If
the parking brake is not completely released, the BRAKE warning
light will remain on.
If
the parking brake is not completely released, the BRAKE warning
light will remain on.
NOTE: Your vehicle has automatically adjusting rear brakes and we do not recommend any adjustment other than the maintenance performed by your authorized dealer.
ABOUT YOUR BRAKES
Your vehicle is equipped with power assisted brakes as standard equipment. In the event power assist is lost for any reason (for example, repeated brake applications with the engine off), the brakes will still function. The effort required to brake the vehicle will be much greater than that required with the power system operating.
WARNING!
Riding the brakes can lead to brake failure and possibly an accident. Driving with your foot resting or riding on the brake pedal can result in abnormally high brake temperatures, excessive lining wear, and possible brake damage. You wouldn’t have your full braking capacity in an emergency.
If either of two hydraulic systems lose normal capability, the remaining system will still function with some loss of overall braking effectiveness. This will be evident by increased pedal travel during application and greater pedal force required to slow or stop.
178 STARTING AND OPERATING
WARNING!
WARNING!
To use your brakes and decelerate more safely, follow these tips:
Do not
"ride" the brakes by resting your foot on the pedal.
This
could overheat the brakes and result in unpredictable
braking
action, longer stopping distances, or brake damage.
When
descending mountains or hills, repeated braking can
cause brake
fade with loss of braking control. Avoid
repeated heavy
braking by downshifting the transmission
whenever possible.
Do not
downshift on icy or slippery roads, because engine
braking may
cause skidding and loss of control.
Engines
may idle at higher speeds during warm-up, which
could cause rear
wheels to spin and result in loss of vehicle
control. Be
especially careful while driving on slippery
roads, in
close-quarter maneuvering, parking or stopping.
Remember, always
engage 4-wheel drive when driving on
slippery roads.
Do not
drive too fast for road conditions, especially when
roads are
wet or slushy. A wedge of water can build up
between the tire
tread and the road. This hydroplaning
action can cause loss of
traction, braking ability, and
control. Under such conditions,
engage 4-wheel drive.
After
going through deep water or a car wash, brakes may
become wet,
resulting in poor performance and unpredict
able braking
action. Dry the brakes by gentle, intermittent
pedal action
while driving at very slow speeds.
The weight and position of cargo and passengers can change the vehicle center of gravity and vehicle handling. To avoid loss of control resulting in personal injury, follow these guidelines:
Always place cargo evenly on the cargo floor,
and
locate heavier objects as low and as far forward
as
possible.
Place as much cargo as possible in front of
the rear
axle. Too much weight or improperly placed weight
over
or behind the rear axle can cause the rear of the
vehicle to
sway.
Do not pile luggage or cargo higher than the
top of
the seatback. This could impair visibility or become
a
dangerous projectile in a sudden stop or collision.
The rear cargo space is intended for load
carrying
purposes only, not for passengers, who should sit
in
seats and use seat belts.
On hardtop models, do not drive with the lift
glass
up. On fabric top models, do not drive with the
rear
window curtain up unless the side curtains are also
open.
This will prevent dangerous exhaust fumes
from entering the
vehicle.
STARTING AND OPERATING 179
WARNING!
WARNING!
To help avoid personal injury, follow these tips:
Never reach through the steering wheel to
operate
steering column controls. Injury to your hands or
loss
of vehicle control may result.
If the engine stalls or power assist fails
due to a
malfunction, vehicle steering and braking will
require
greater effort.
ANTI-LOCK BRAKE SYSTEM — IF EQUIPPED
The Anti-Lock Brake System is designed to aid the driver in maintaining vehicle control under adverse braking conditions. The system operates with a separate computer to modulate hydraulic pressure to prevent wheel lock-up and help avoid skidding on slippery surfaces.
All vehicle wheels and tires must be the same size and type and tires must be properly inflated to produce accurate signals for the computer.
Significant over or under-inflation of tires, or mixing sizes of tires or wheels on the vehicle can lead to loss of braking effectiveness.
The Anti-Lock Brake System conducts a low speed self-test at about 12 mph (20 km/h). If for any reason, your foot is on the brake when the vehicle reaches 12 mph (20 km/h), this check will be delayed until 25 mph (40 km/h).
The Anti-Lock Brake System pump motor runs during the self-test and during an ABS stop to provide the regulated hydraulic pressure. The motor pump makes a low humming noise during operation, this is normal.
During off-road use, loss of traction can temporarily defeat the system and cause the warning light to illuminate. Turn the ignition OFF and ON again to restore Anti-Lock Brake System function.
180 STARTING AND OPERATING
WARNING!
WARNING!
Pumping of the Anti-Lock Brakes will diminish their effectiveness and may lead to an accident. Pumping makes the stopping distance longer. Just press firmly on your brake pedal when you need to slow down or stop.
Anti-lock
system (ABS) cannot prevent the natu
ral laws of physics
from acting on the vehicle, nor
can it increase braking or
steering efficiency be
yond that afforded by the condition
of the vehicle
brakes and tires or the traction afforded.
The ABS
cannot prevent accidents, including
those resulting from
excessive speed in turns,
following another vehicle too closely,
or hydro
planing. Only a safe, attentive, and skillful
driver
can prevent accidents.
The
capabilities of an ABS equipped vehicle must
never be exploited
in a reckless or dangerous
manner which could jeopardize the
user’s safety
or the safety of others.
STARTING AND OPERATING 181
CAUTION!
The
Anti-Lock Brake System is subject to possible detrimental effects of
electronic interference caused by improperly installed aftermarket
radios or telephones.
NOTE: During severe braking conditions, a pulsing sensation may occur and a clicking noise will be heard. This is normal, indicating that the Anti-Lock Brake System is functioning.
ON-ROAD DRIVING TIPS
Utility vehicles have higher ground clearance and a narrower track to make them capable of performing in a wide variety of off-road applications. Specific design characteristics give them a higher center of gravity than ordinary cars.
An advantage of the higher ground clearance is a better view of the road, allowing you to anticipate problems. They are not designed for cornering at the same speeds as
conventional 2-wheel drive vehicles any more than low-slung sports cars are designed to perform satisfactorily in off-road conditions. If at all possible, avoid sharp turns or abrupt maneuvers. As with other vehicles of this type, failure to operate this vehicle correctly may result in loss of control or vehicle rollover.
OFF-ROAD DRIVING TIPS
When To Use Low Range
When driving off-road, shift to 4L (Low) for additional traction in pulling forward or descending a hill, for low-speed pulling power or to improve handling and control on slippery or difficult terrain. Also use 4L (Low) in rain, ice, snow, mud or sand to get heavy loads rolling, or whenever 4H (High) range four-wheel drive traction will not do the job.
In Snow, Mud and Sand
In heavy snow, when pulling a load, or for additional control at slower speeds, shift the transmission to a low gear and shift the transfer case to 4L (Low) if necessary.
STARTING AND OPERATING
Don’t
shift to a lower gear than necessary to maintain headway.
Over-rewing the engine can spin the wheels and traction will be
lost.
Do not downshift on icy or slippery roads because engine braking may cause skidding and loss of control.
When driving on soft sand, reduce your tire pressure to 15 psi (103 kPa) minimum to allow greater tire surface area. You must return the tires to normal air pressure before driving on pavement or other hard surfaces.
NOTE: Reduced tire pressures below 15 psi (103 kPa) may cause tire unseating and loss of air pressure.
Hill Climbing
Before climbing a steep hill, change transmission to a lower gear and shift the transfer case to 4L (Low). Use first gear and 4L (Low) for very steep hills.
If you stall or begin to lose headway while climbing a steep hill, allow your vehicle to come to a stop and immediately apply the brake. Restart the engine and shift to R (Reverse). Back up slowly down the hill allowing the compression braking of the engine and transmission to
help regulate your speed. If the brakes are required to control vehicle speed, apply them lightly and avoid locking or skidding the tires.
WARNING!
If the engine stalls or you lose headway or cannot make it to the top of a steep hill or grade, never attempt to turn around. To do so may result in tipping and rolling the vehicle. Always back carefully straight down a hill in R (Reverse) gear. Never back down a hill in N (Neutral) or with the clutch pedal depressed, using only the brake.
Remember,
never drive diagonally across a hill, always drive straight up or
down.
If the wheels start to slip as you approach the crest of a hill, ease off the accelerator and maintain headway by turning the front wheels sharply left and right. This will provide fresh "bite" into the surface and will usually provide traction to complete the climb.
STARTING AND OPERATING 183
 Traction
Downhill
Traction
Downhill
Shift the transmission into a low gear and transfer case to 4L (Low) range. Let the vehicle go slowly down the hill with all four wheels turning against engine compression drag. This will permit you to control the vehicle speed and direction.
After Driving Off-Road
Off-road operation puts more stress on your vehicle than does most on-road driving. After driving off-road, it is always a good idea to check for damage.
Completely
inspect the underbody of your vehicle.
Check tires, body
structure, steering, suspension, and
exhaust system for damage.
Check
threaded fasteners for looseness, particularly on
the chassis,
drivetrain components, steering, and sus
pension. Retighten
them, if required, and torque to the
values specified in the
Service Manual.
Check
for accumulations of plants or brush. These
things could be a
fire hazard, or they might hide
damage to fuel lines, brake
hoses, axle pinion seals,
and propeller shafts.
After extended operation in mud, sand, water, or similar dirty conditions, have brake drums, brake linings, and axle yokes inspected and cleaned as soon as possible.
WARNING!
Abrasive material in any part of the brakes may cause excessive wear or unpredictable braking. You might not have full braking power when you need it to prevent an accident. If you have been operating your vehicle in dirty conditions, get your brakes checked and cleaned as necessary.
If
you experience unusual vibration after driving in mud, slush or
similar conditions, check the wheels for packed material. Packed
foreign material can cause a wheel imbalance and freeing the wheels
will correct the situation.
184 STARTING AND OPERATING ■ TIRE SAFETY INFORMATION Tire Markings
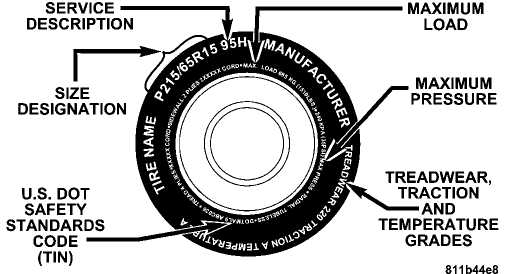
NOTE: P(Passenger)-Metric tire sizing is based on U.S. design standards. P-Metric tires have the letter "P" molded into the sidewall preceding the size designation. Example: P215/65R15 95H.
NOTE: European Metric tire sizing is based on European design standards. Tires designed to this standard have the tire size molded into the sidewall beginning with the section width. The letter "P" is absent from this tire size designation. Example: 215/65R15 96H
NOTE: LT(Light Truck)-Metric tire sizing is based on U.S. design standards. The size designation for LT-Metric tires is the same as for P-Metric tires except for the letters "LT" that are molded into the sidewall preceding the size designation. Example: LT235/85R16.
NOTE: Temporary Spare tires are high pressure compact spares designed for temporary emergency use only. Tires designed to this standard have the letter "T" molded into the sidewall preceding the size designation. Example: T145/80D18 103M.
NOTE: High Flotation tire sizing is based on U.S. design standards and begins with the tire diameter molded into the sidewall. Example: 31x10.5 R15 LT.
STARTING AND OPERATING 185 Tire Sizing Chart
|
EXAMPLE: Size Designation: P = Passenger car tire size based on U.S. design standards "....blank...." = Passenger car tire based on European design standards LT = Light Truck tire based on U.S. design standards T = Temporary Spare tire 31 = Overall Diameter in Inches (in) 1 215 = Section Width in Milimeters (mm) 1 65 = Aspect Ratio in Percent (%) —Ratio of section height to section width of tire. 10.5 = Section Width in Inches (in) R = Construction Code —"R" means Radial Construction. —"D" means Diagonal or Bias Construction. 15 = Rim Diameter in Inches (in) |