4.0L CEC SYSTEM
1988 Jeep Cherokee
1988 COMPUTERIZED ENGINE Controls
ENGINE CONTROL SYSTEM
JEEP 4.0L MPFI 6-CYLINDER
Cherokee, Comanche & Wagoneer
DESCRIPTION
The 4.0L engine control system controls engine operation to
lower exhaust emissions while maintaining good fuel economy and
driveability. The system is designed to maintain a 14.7:1 air/fuel
ratio under all engine operating conditions. When the ideal air/fuel
ratio is maintained, the catalytic converter can control oxides of
nitrogen (NOx), hydrocarbon (HC), and carbon monoxide (CO) emissions.
The system consists of the following sub-systems: Fuel
Control, Data Sensors and Switches, Electronic Control Unit (ECU)
,
Diagnostics, Electronic Spark Advance, Idle Speed Control, Exhaust Gas
Recirculation, and Transmission Shift Light.
OPERATION
FUEL CONTROL
The fuel control system delivers fuel to the engine. Fuel
from the in-tank fuel pump flows to the fuel rail, injectors and
pressure regulator. The pressure regulator maintains fuel system
.
pressure at 31-39 psi (2.l-2.7 kg/cm ). Excess fuel is returned to the
tank by a fuel return line.
The fuel pump is energized through the fuel pump relay that
is located on the right inner fender panel in the engine compartment.
Battery voltage is provided through the ignition switch and is
energized when the ECU completes the ground path.
The fuel injectors are electrically operated solenoid valves.
The ECU determines injector pulse width ("on/off") time based upon
engine operating conditions and delivers the proper pulse width to
maintain an air/fuel ratio of 14.7:l.
The ECU varies the amount of voltage applied to the injectors
to compensate for battery voltage changes. Battery voltage information
is provided to the ECU through the wiring harness. No sensor or switch
is required.
DATA SENSORS & SWITCHES
Each sensor and/or switch furnishes electronic impulses to
the ECM. Based on these input signals, the ECM computes spark timing
and air/fuel mixture for proper engine operation.
Coolant Temperature Sensor (CTS)
The CTS is located on the left side of the block, just below
exhaust manifold. The sensor provides coolant temperature information
to the ECU. Engine coolant temperature is used by the ECU for the
following functions:
* Enrich air/fuel mixture for cold engine starts.
* Control idle speed during warm-up.
* Increase spark advance during cold engine operation.
* Prevent EGR flow during cold engine operation.
Manifold Absolute Pressure (MAP) Sensor
The MAP sensor measures changes in intake manifold pressure
resulting from engine load and speed changes. The MAP sensor is
located in the engine compartment, on the firewall behind the engine.
The ECU uses this information to control fuel delivery and ignition
timing.
Oxygen (O2) Sensor
The oxygen sensor is mounted in the exhaust manifold to
monitor oxygen content of exhaust gases. The oxygen content reacts
with the oxygen sensor to produce a voltage output signal which is
sent to the ECU.
The oxygen sensor is equipped with a heating element that
keeps the sensor at a consistent temperature under warm-up and idle
conditions. This allows the engine control system to enter "closed
loop" mode of operation much earlier, and to remain in "closed loop"
during extended idle periods.
The heating element of the sensor is controlled by the ECU
through the O2 sensor heater relay. This is a normally closed relay
that supplies voltage to the sensor under warm-up and idle conditions.
When the ECU receives information from the MAP and speed sensors
indicating that the sensor will stay heated due to exhaust gas
temperature, the ECU opens the relay to stop voltage to the heating
element.
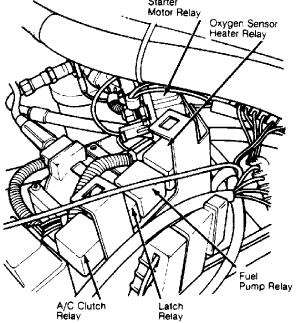
Fig. 1: Location & Identification of 4.0L Relays
Throttle Position Sensor (TPS)
The TPS is a variable resistor connected to the throttle
shaft. The sensor is a potentiometer that has one end connected to the
ECU signal line and the other end connected to ground. As throttle
valve angle changes, a return voltage is sent back to the ECU through
the third wire. Output voltage to the ECU is about one volt when
throttle valve is at idle position, and about 5 volts when throttle
valve is at wide open throttle.
A dual TPS is used on automatic transmission equipped models.
The additional sensor provides throttle position information to the
transmission.
Knock Sensor
A knock sensor is mounted on the lower left side of block,
just above the oil pan. This sensor detects abnormal engine vibration
due to "detonation" and/or "pre-ignition". The knock sensor supplies
detonation information to the ECU. The ECU then alters ignition timing
as needed to maintain maximum timing under most operating conditions.
Park/Neutral (P/N) Switch
The P/N switch is mounted in automatic transmission equipped
vehicles. The switch indicates when the transmission is in Park or
Neutral.
Speed Sensor
The speed sensor is a nonadjustable sensor attached to the
flywheel/drive plate housing with special shoulder bolts. This sensor
provides Top Dead Center (TDC) and engine speed information to the ECU
by counting the flywheel teeth as they pass during engine operation.
The flywheel has a large trigger tooth and notch located 12 small
teeth before each TDC position. See Fig. 2.
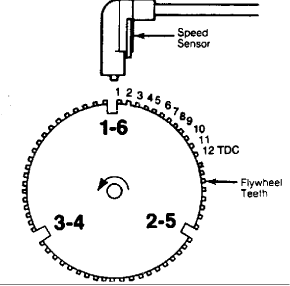
Fig. 2: Design of Speed Sensor
When a small tooth and notch pass the magnetic core of the
sensor, the concentration and collapse of the magnetic field created
induces a small voltage spike into the sensor pick-up coil windings.
These small voltage spikes give the ECU information for calculating
engine speed.
When a large tooth and notch pass the magnetic core of the
sensor, the concentration and collapse of the magnetic field created
induces a higher voltage spike into the sensor pick-up coil windings.
This higher voltage spike indicates to the ECU that a piston will soon
be at TDC (12 teeth later)
.
The ECU uses speed sensor information for advancing or
retarding ignition timing, dependent upon input from other sensors and
switches.
A/C "ON" Switch
This switch signals the ECU that the A/C system is energized.
This signal is used by the ECU to increase idle speed.
Starter Motor Relay
Although no switch or sensor is used, the ECU requires this
information for fuel enrichment during starting. This information is
passed on the the ECU through the starter motor relay.
Distributor Reference Signal
Although no switch or sensor is used, the ECU requires this
information for ignition timing and fuel supply. This information is
relayed to the ECU through a "synch pulse" provided by the distributor
stator. This allows the ECU to synchronize injector opening with
intake valve opening.
ELECTRONIC CONTROL MODULE (ECM)
The Electronic Control Unit (ECU) is the "brain" of the
engine control system. The ECU is located in the passenger
compartment, under left side of dash to right of steering column.
The ECU senses engine operating conditions, processes input
signals, and controls the various systems that affect vehicle
performance.
DIAGNOSTICS
The engine control system has diagnostic capabilities. Using
System Tester (M.S. 1700), diagnostics can be performed on the system
to more accurately determine faulty components. The diagnostic
connectors are located in the engine compartment at the right shock
tower (or under left side of instrument panel)
.
NOTE: Information for diagnosing the engine control system using
the System Tester (M.S. 1700) was not available from
manufacturer. Only component testing is provided.
ELECTRONIC SPARK ADVANCE
Based upon engine operating conditions received from the
sensors and switches, the ECU controls spark timing. The ECU triggers
the ignition coil through the ignition control module.
IDLE SPEED CONTROL
Idle speed is controlled by the ECU through the idle speed
stepper motor. A latch relay is used to program the stepper motor for
engine start-up. The relay is located on the right inner fender panel.
See Fig. 1. The ECU energizes the latch relay when engine is in
cranking mode, and keeps the relay energized for 3-5 seconds after the
engine is stopped. In this way, the stepper motor can provide the
proper increased enrichment for the next engine start. Idle speed is
nonadjustable.
EMISSION CONTROL
The ECU electrically controls Exhaust Gas Recirculation (EGR)
.
An ECU-controlled solenoid valve is used to control EGR valve
function. This valve is located on the left inner fender panel and is
operated by the ECU in response to coolant temperature, throttle
position, and manifold pressure.
Under conditions of engine warm-up, engine idle, wide open
throttle, or rapid acceleration/deceleration, the solenoid valve is
energized, blocking vacuum to the EGR valve. At normal operating
temperatures with engine speed above idle, the solenoid valve is de
energized, allowing normal EGR valve function.
NOTE:
If the electrical connector is removed from the EGR solenoid,
EGR flow will be allowed at all times.
A/C CLUTCH CONTROL
The ECU controls the A/C compressor clutch to improve idle
quality. The A/C compressor clutch will be engaged or disengaged as
deemed necessary by the ECU through the A/C clutch relay.
SHIFT LIGHT CONTROL
The shift light system is used on all manual transmission
equipped vehicles. The ECU monitors coolant temperature, throttle
position, vehicle speed, and engine speed to control the shift light.
The ECU calculates what gear position the vehicle should be in and
uses this information to turn on the light. The light indicates the
best shift point to the driver for maximum fuel economy.
The light is tested when the ignition switch is turned on.
When the engine is started, the light should go out. A transmission
mounted switch prevents the light from illuminating when the
transmission is shifted into high gear. The ECU turns the light off if
the shift to the next higher gear is not performed within 3-5 seconds
after light comes on.
DIAGNOSIS & TESTING
PRELIMINARY CHECKS
Before assuming that the ECU is faulty, the following systems
and components must be in good condition and operating properly:
*****
***
Air filter.
All support systems and wiring.
Battery connections and specific gravity.
Compression pressure.
Electrical and vacuum connections to components, sensors and
switches.
Emission control devices.
Ignition system.
All vacuum and fuel line (hose) connections.
FUEL SYSTEM TEST
Fuel Pressure
1) Remove cap from pressure test port on fuel rail and
connect Fuel Pressure Gauge (J-34730-1). See Fig. 3. Start engine and
observe fuel pressure. With vacuum hose connected to pressure
.
regulator, pressure should be about 31 psi (2.2 kg/cm )), and about 39
.
psi (2.7 kg/cm )) with vacuum hose disconnected.
2) If pressure is not as specified, inspect fuel supply and
return lines for kinks and obstructions. If fuel lines are okay,
replace pressure regulator. Remove gauge and install cap on test port.
Fuel Flow
1) Remove cap from the pressure test port on the fuel rail.
See Fig. 3. Connect piece of hose to port and place other end in
graduated container of at least one quart (1L) capacity.
2) Pinch off fuel return line. Run fuel pump by placing
jumper wire between terminals "D1-5" and "D1-6" of diagnostic
connector "D1". If fuel flow is less than one quart (1L) in one
minute, replace fuel pump. Remove hose and install test port plug.
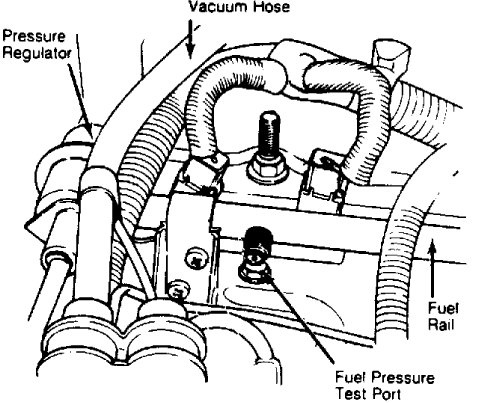
Fig. 3: Location of Fuel Pressure Test Port
Fuel Injector Test
See the FUEL INJECTOR DIAGNOSTICS chart near the end of this
article. See Fig.
9
COMPONENT TESTING
Throttle Position Sensor
See THROTTLE POSITION SENSOR DIAGNOSTICS chart near the end
of this article. See Fig. 8.
Coolant Temperature Sensor (CTS)
&
Manifold Air Temperature (MAT) Sensor
1) Disconnect the electrical connector from the sensor. Using
a high impedance, digital volt/ohmmeter, measure the resistance of the
sensor. If measured resistance is not as specified, replace sensor.
See the CTS & MAT SENSOR TEMPERATURE-TO-RESISTANCE VALUE table.
2) Test electrical harness resistance of both sensors by
testing between ECU harness connector "D-3" and sensor connector. Also
test between sensor connector and ECU harness connector "C-10" ("C-8"
on MAT sensor). Repair wire if open circuit is detected. Repair MAT
sensor wiring harness if resistance is greater than one ohm.
CTS & MAT SENSOR TEMPERATURE-TO-RESISTANCE VALUE
------------------
. F( . C) Ohms
212 (100) .................................. 185
160 (71) ................................... 450
100 (38) .................................. 1600
70 (21) ................................... 3400
40 (4) .................................... 7500
20 (-7) ................................. 13,500
0 (-18) ................................. 25,000
-40 (-40) .............................. 100,700
------------------
Manifold Absolute Pressure (MAP) Sensor
NOTE:
Terminal identification letters are stamped on MAP sensor
body.
1) Disconnect electrical connector from sensor. With ignition
on and engine stopped, measure voltage output of sensor terminal "B"
.
See Fig. 4. Ensure wiring harness is okay by also measuring voltage at
ECU terminal "C-t". Output voltage should be 4-6 volts at both points.
Repair or replace wiring harness as required.
2) With ignition on and engine stopped, measure supply
voltage of sensor terminal "C". See Fig. 4. Ensure wiring harness is
okay by also measuring voltage at ECU terminal "C-14". Supply voltage
should be 4.4-5.5 volts at both points. Repair or replace wiring
harness as required.
3) Using an ohmmeter, measure ground circuit resistance at
sensor terminal "A" and ECU connector terminal "D-3". Ensure wiring
harness is okay by also measuring resistance between ECU terminal "
D
3" and "B-11". If ohmmeter indicates an open circuit, check for
defective sensor ground connection at right side of cylinder block.
4) If ground connection is okay, replace ECU. If ECU terminal
"D-3" has short to 12-volts, repair wire before replacing ECU. Repair
or replace wiring harness as required.
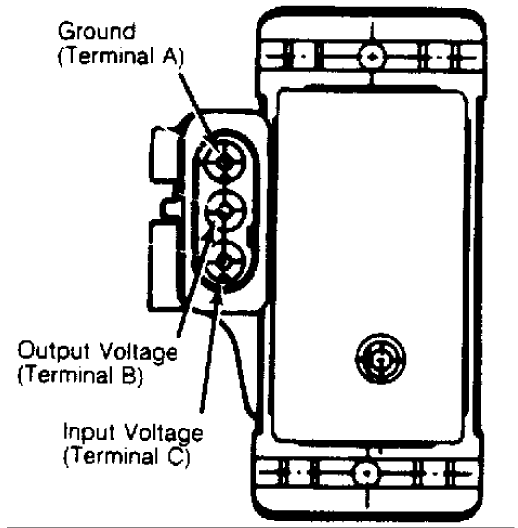
Fig. 4: MAP Sensor Terminal Identification
Oxygen Sensor
Oxygen sensor must be tested with System Tester (M.S. 1700)
.
Oxygen Sensor Heating Element
Disconnect electrical connector from oxygen sensor. Using an
ohmmeter, measure resistance between connector terminals "A" and "B"
(marked on connector). See Fig. 5. If resistance is not 5-7 ohms,
replace sensor.
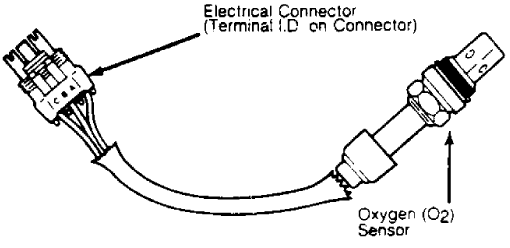
Fig. 5: Testing Oxygen Sensor Heating
Element Resistance
Knock Sensor
Knock sensor must be tested with System Tester (M.S. 1700)
.
Speed Sensor
Disconnect speed sensor electrical connector from the sensor.
Using an ohmmeter, measure resistance between connector terminals "A"
and "B" (marked on connector). If reading is not 125-275 ohms with
engine at normal operating temperature, replace speed sensor.
"Synch Pulse" (Stator)
1) Using an analog voltmeter, insert positive probe into Blue
wire at distributor connector. Insert negative probe into Gray wire
with tracer at distributor connector.
NOTE:
Do not remove connector from distributor. Insert voltmeter
leads from rear of connector. Do not puncture wire.
2) With voltmeter set on "15-Volt A/C" scale, turn ignition
on. Voltmeter should indicate 5 volts. If voltage is indicated, go to
step 4). If no voltage is indicated, check voltmeter leads for good
connection and go to next step.
3) If there is still no voltage reading, turn ignition off
and remove ECU. Reconnect harness and turn ignition off and remove
ECU. Reconnect harness and turn ignition on. Check for voltage between
ECU pin "C-16" and good ground. If voltage still does not register,
test system with System Tester (M.S. 1700)
.
4) If 5 volts was detected, check for continuity at the
following points:
*
Between Blue wire at distributor connector and terminal "C-16"
at ECU.
*
Between Gray wire with tracer at distributor connector and
terminal "C-5" at ECU.
*
Between Black wire at distributor connector and good ground.
If no continuity is shown, repair wiring harness. If
continuity is shown, reconnect voltmeter as in step 2)
.
5) While observing voltmeter, crank engine. Voltmeter needle
should fluctuate back and forth during engine cranking. This verifies
proper operation of distributor stator. If voltmeter needle does not
fluctuate, replace stator.
EGR Solenoid Valve
1) Make sure vacuum is present at port "C" of the solenoid.
See Fig. 6. Remove vacuum connector from ports "A" and "B" of
solenoid. Connect vacuum gauge to port "B". Start engine and run at
idle. Vacuum should not be present at port "B"
.
2) Disconnect electrical connector from solenoid. Vacuum
should now be present at port "B". Stop engine. Reconnect electrical
connector at solenoid. Remove vacuum gauge and reconnect vacuum hoses.
Relays - General Testing
1) The relays used on the 4.0L engine are all of the same
basic construction and design. Terminal No. 30 is usually connected to
battery voltage ("switched" or battery positive at all times)
.
Terminal No. 87A is connected to terminal No. 30 in de-energized
position.
2) Terminal No. 87 is connected to terminal No. 30 in the
energized position. This connection supplies battery voltage to the
operated device.
3) Terminal No. 86 is connected to the electromagnet of the
operated device; usually through a "switched" power source. Terminal
No. 85 is connected to the electromagnet of the operated device;
usually grounded through a switch or the ECU.
NOTE: Not all relays have battery voltage applied at terminal No.
30. Some may have battery voltage applied at terminal Nos. 87
or 87A. Check design of relay before testing.
4) When testing relays, there should be continuity between
terminal Nos. 87A and 30 when relay is in de-energized position.
Resistance between terminal Nos. 85 and 86 should be 70-80 ohms for
resistor-type relays and 81-91 ohms for diode-type relays.
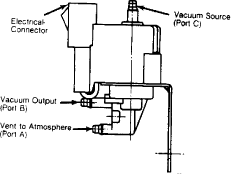
Fig. 6: Testing EGR Solenoid Valve
Starter Motor Relay
1) Disconnect electrical connectors from terminals "I" and
"G". Using an ohmmeter, measure resistance between the terminals.
Resistance value should be about 22 ohms. Measure resistance between
either terminal and battery negative post. Resistance value should be
infinite. If resistance values are not as specified, replace relay. If
okay, reconnect electrical connectors.
2) Disconnect electrical connector from "SOL" terminal.
Connect voltmeter between terminal and battery negative post. While
observing voltmeter, turn ignition switch to "START" position. If 12
volts is not indicated, check and repair wiring harness, bulkhead
connector, and/or ignition switch. If battery voltage is present, go
to next step.
3) If battery voltage is present, but starter relay does not
work, place transmission in Park (Neutral for man. trans.) and apply
parking brake. Disconnect electrical connector from terminal "I" (Dark
Green wire) and apply battery voltage to terminal. Using a jumper
wire, touch terminal "G" to ground. If relay does not click, replace
relay. If relay does click, repair ground circuit.
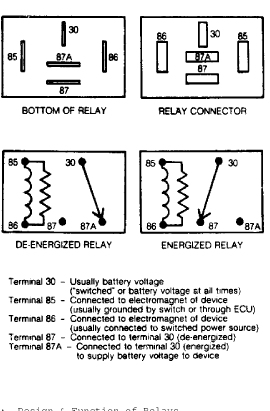
Fig. 7: Design & Function of Relays
REMOVAL & INSTALLATION
ELECTRONIC CONTROL UNIT (ECU)
Removal & Installation
Information not available from manufacturer.
COOLANT TEMPERATURE SENSOR (CTS)
Removal & Installation
Drain cooling system. Remove air cleaner assembly. Disconnect
electrical connector and remove sensor from block. To install, reverse
removal procedure. Refill cooling system.
OXYGEN (O2) SENSOR
Removal & Installation
Raise and support vehicle. Disconnect electrical connector
from sensor. Remove sensor from exhaust manifold. Install and tighten
sensor to 35 ft. lbs. (47 N.m). Reconnect electrical connector. Lower
vehicle.
THROTTLE POSITION SENSOR (TPS)
Removal
Disconnect electrical connector from TPS. Bend lock tabs away
from retaining screws and remove screws. Remove TPS.
Installation
With throttle valve in normal closed position, install TPS.
Install TPS retaining screws. Perform OUTPUT CHECK.
NOTE:
Throttle position sensor is nonadjustable. Only output
voltage can be monitored.
Output Check (Manual Transmission Only)
1) Connect negative lead of digital voltmeter to terminal "B"
and positive lead to terminal "A" of TPS connector. Do not disconnect
electrical connector. Insert leads through back of connector. It may
be necessary to remove throttle body from vehicle to gain access to
connector.
2) Turn ignition on, engine off. With throttle closed and
resting against idle stop, input voltage should be about 5 volts. Move
positive lead from terminal "B" to terminal "C" and read voltage
output. Output voltage should be about 0.8 volt with throttle closed
and resting against idle stop.
3) If voltage is not as specified, loosen lower retaining
screw and pivot sensor for large adjustments. Loosen upper retaining
screw and pivot sensor for small adjustments. Adjust sensor so output
voltage reading equals 16 percent of input voltage. If voltage
specifications cannot be obtained, replace sensor. Remove voltmeter.
Tighten screws and bend retaining tabs into position.
ALL OTHER SENSORS, SOLENOIDS & SWITCHES
Removal & Installation
Removal of sensors, switches, and solenoids is accomplished
by disconnecting the electrical and/or vacuum connectors and removing
or detaching the component. To install, reverse removal procedure.
TESTING
NOTE:
Refer to Figs. 8-10 for Testing information.
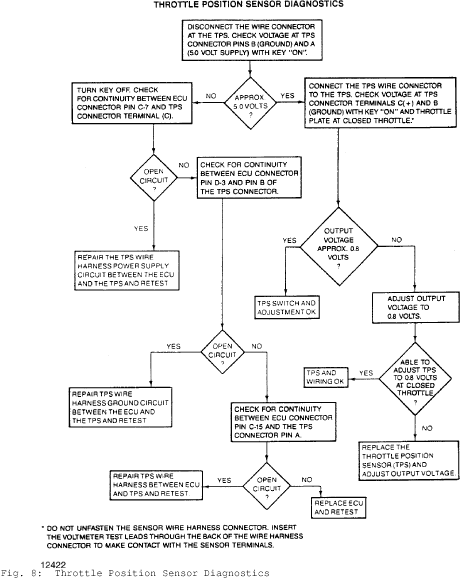
Fig. 8: Throttle Position Sensor Diagnostics
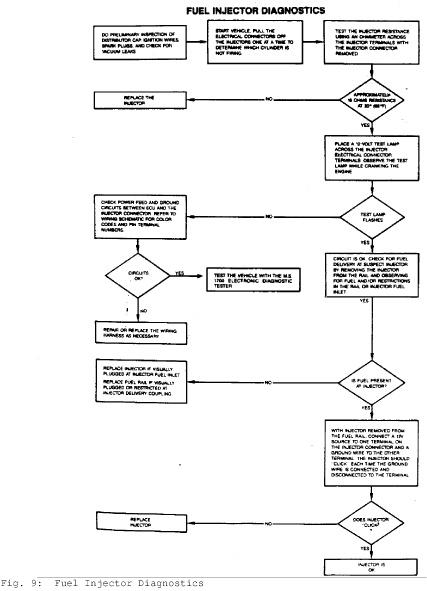
Fig. 9: Fuel Injector Diagnostics

Fig. 10: ECU Connector Pin & Diagnostic Connector Pin Identification
WIRING DIAGRAM
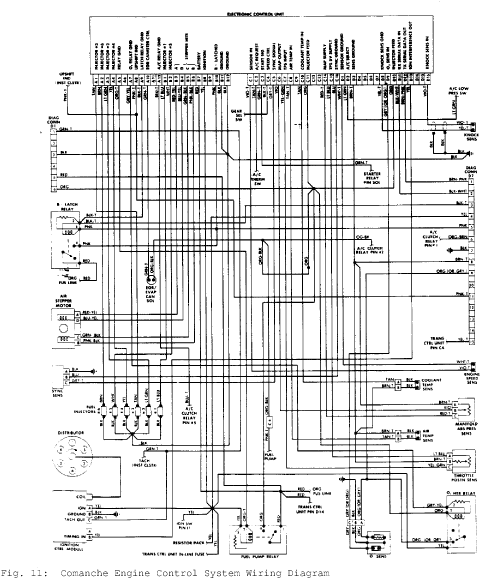
Fig. 11: Comanche Engine Control System Wiring Diagram
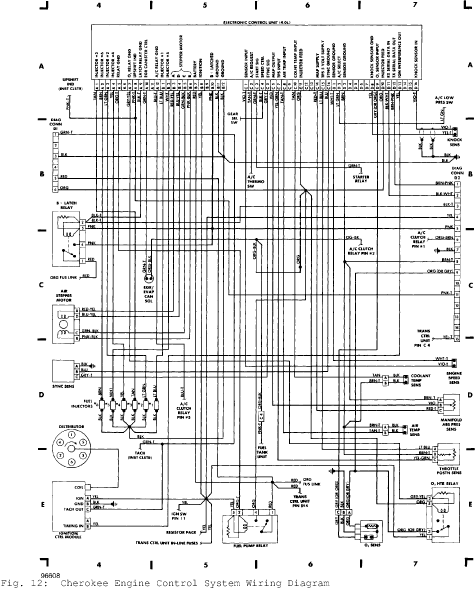
Fig. 12: Cherokee Engine Control System Wiring Diagram
