CLUTCH
1988 Jeep Cherokee
1988 Clutch Hydraulic
Cherokee, Comanche, Wagoneer, Wrangler
DESCRIPTION
The clutch assembly consists of a single dry-disc driven plate and a one-piece diaphragm spring-type clutch cover. On Wrangler 4-cylinder models, the clutch cover and driven plate diameter is 9.28"
(232 mm). On Wrangler 6-cylinder models, the clutch cover and driven plate diameter is 10.5" (266 mm). On all other 4 and 6-cylinder models, the clutch cover and driven plate diameter is 9.7"
(246 mm). The clutch is actuated through a hydraulic master cylinder and slave cylinder.
On Wrangler models, the slave cylinder is mounted inside the clutch housing. The bearing is permanently attached to the cylinder piston.
TRANSMISSION APPLICATION
Vehicle Model Transmission Model
Cherokee, Comanche, Wagoneer Aisin AX4 4-Speed
Aisin AX5 5-Speed O/D
Wrangler Aisin AX5 5-Speed O/D
Peugeot BA 10/5 5-Speed O/D
REMOVAL & INSTALLATION
TRANSMISSION
Removal
1) Remove the shift knob and lock nut from transmission and
transfer case shift levers (if equipped). On Wrangler models, remove
screws attaching transmission and transfer case shift lever boots and
remove both boots.
2) On all other models, raise outer gearshift lever boot and
remove upper part on center console. Remove lower part of console,
remove inner boot and gearshift lever.
On Wrangler models, remove transmission shift tower dust
cover. Remove transmission shift lever and stub shaft. DO NOT remove
shift lever from stub shaft.
On all models, raise and support vehicle. Drain
transmission lubricant. Mark rear drive shaft for reassembly and
remove rear drive shaft. Support transmission assembly and remove
crossmember. Disconnect speedometer cable and wiring from back-up
light switch.
On 4WD models, drain transfer case lubricant. Disconnect
transfer case vacuum hoses and linkage. Tag vacuum hoses for
reassembly. Disconnect front drive shaft and secure out of way.
On all models, remove clutch slave cylinder. Position
transmission jack under transmission assembly. Remove bolts securing
clutch housing to engine and remove transmission assembly. Remove
throw-out lever, bearing, and pivot ball from clutch housing.
Installation
To install, reverse removal procedure.
CLUTCH
Removal
Remove transmission assembly. Mark position of clutch cover on flywheel for reassembly reference. Evenly loosen clutch cover bolts one or 2 turns at a time until clutch cover spring tension is released. Remove cover bolts, clutch cover, and disc. See Fig. 1.
Installation
Check all components for wear or damage and replace as
necessary. Using clutch alignment tool, align clutch disc and loosely
install clutch cover. Be sure marks made during removal are aligned.
To avoid warping clutch cover, tighten each cover bolt a
few turns at a time. To complete installation, reverse removal
procedure.
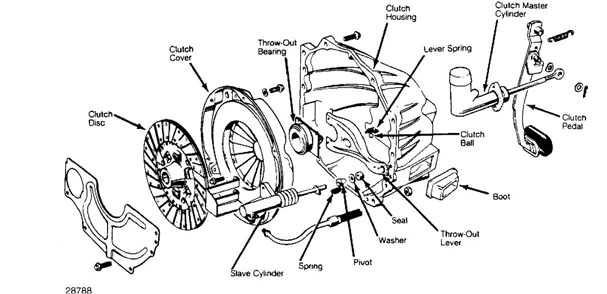
Fig. 1: Exploded View Of Cherokee, Comanche & Wagoneer Hydraulic
Clutch Assembly
Wrangler has a one-piece slave cylinder.
CLUTCH MASTER CYLINDER
Removal system.
Disconnect hydraulic line at master cylinder. Plug
openings to prevent dirt from entering system. Remove cotter pin and
washer holding cylinder push rod on clutch pedal.
Slide push rod off pedal pivot. Remove nuts attaching
clutch master cylinder to studs on dash panel and remove cylinder.
Installation
To install, reverse removal procedure. Bleed hydraulic
CLUTCH SLAVE CYLINDER
Removal (Wrangler) system.
Disconnect slave cylinder inlet line. Remove transmission
and transfer case. Slide rubber insulator off slave cylinder lines.
Remove bolts attaching insulator bracket to clutch housing. Slide
bracket off cylinder lines.
Remove slave cylinder and bearing retaining nut. Pry nut
up and off mounting pin on transmission front case. Remove slave
cylinder and bearing by sliding assembly off transmission input shaft.
See Fig. 2.
Installation
To install, reverse removal procedure. Bleed hydraulic
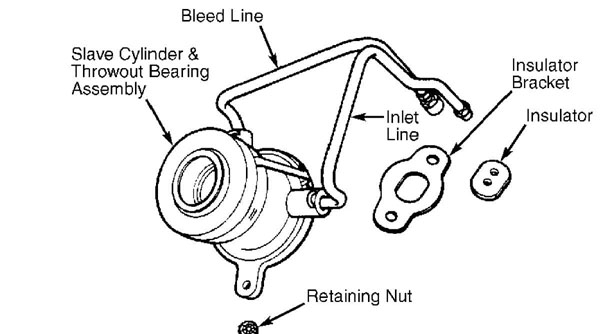
32327
Fig. 2: Wrangler Clutch Slave Cylinder Courtesy of Chrysler Motors.
Removal (Cherokee, Comanche & Wagoneer)
Disconnect hydraulic line at clutch slave cylinder. Cap line to prevent fluid loss. Remove spring holding clutch fork lever to cylinder push rod. Remove bolts attaching slave cylinder to clutch housing. Remove slave cylinder, heat shield, clutch fork pivot, washer and seal.
Installation
To install, reverse removal procedure. Bleed hydraulic system.
PILOT BUSHING
Removal (Cherokee, Comanche & Wagoneer)
Remove clutch assembly. Remove pilot bushing using Slide Hammer (J-2619-01) and Bushing Remover (J-5822).
Installation
Lubricate replacement bushing with engine oil. Remove pilot bushing lubricating wick and soak wick in engine oil. Install wick in bushing bore. Install bushing using Clutch Pilot Shaft (J-33169) . Keep pilot shaft parallel with crankshaft center line to prevent damage to bushing. Reverse removal procedure to complete installation.
OVERHAUL
CLUTCH MASTER CYLINDER
Disassembly
Remove reservoir cap and cover. Remove push rod dust
cover. Remove snap ring holding push rod in cylinder bore. Discard
dust cover and snap ring.
Remove push rod, retaining washer, and seal as an assembly. Discard seal. Remove plunger, valve spring, and valve stem assembly from cylinder bore by tapping cylinder body on wood block.
NOTE: Retainer tab is located in rectangular slot in side of stem retainer.
Remove valve stem from retainer. Remove spring washer and
stem tip seal from end of valve stem. See Fig. 3. Discard stem tip
seal and spring washer. Clean parts with brake fluid or brake cleaning
solvent.
Inspect cylinder bore for wear, nicks or scores. Master
cylinder bore must be clean and smooth. Light discoloration is
acceptable. Replace if necessary. Clutch master cylinder must not be
honed under any circumstances.
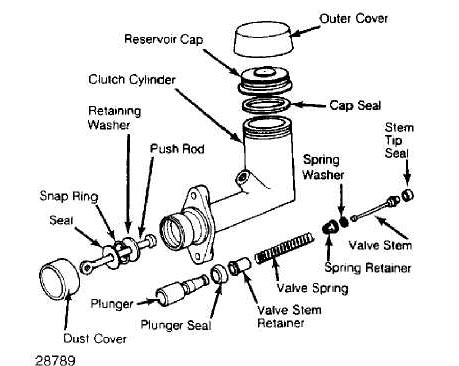
Fig. 3: Exploded View Of Clutch Master Cylinder Courtesy of Chrysler Motors.
Reassembly
1) Lubricate cylinder bore with brake fluid. Make sure lip of
plunger seal faces stem end of plunger. Install stem tip seal so seal shoulder fits in undercut at end of valve stem.
2) End of valve stem should pass through stem retainer and seat in small bore in end of plunger. Bend retainer tab downward to lock stem and retainer on plunger. To complete assembly, reverse disassembly procedures.
CLUTCH SLAVE CYLINDER
Disassembly
NOTE: On Wrangler models, the integral slave cylinder and throw out bearing assembly is not serviceable. If cylinder, bearing or lines become damaged the entire assembly must be replaced.
Clean cylinder exterior. Remove dust boot from cylinder.
Remove cylinder push rod, plunger and spring as an assembly. Remove
spring seal from plunger.
Remove snap ring holding push rod in plunger. Remove push
rod and boot. Remove boot from push rod. See Fig. 4. Clean parts with
brake fluid or brake cleaning solvent. Inspect cylinder bore for wear,
nicks or scores. Replace if necessary.
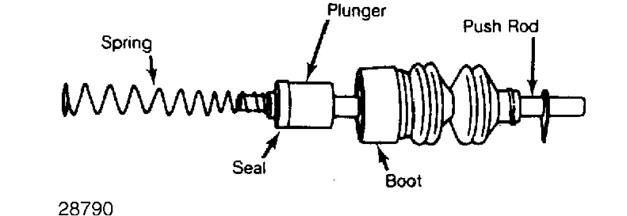
Fig. 4: Exploded View Of Clutch Slave Cylinder Courtesy of Chrysler Motors.
Reassembly
Reverse disassembly procedure. Lubricate cylinder bore and seal with brake fluid before reassembly.
HYDRAULIC SYSTEM BLEEDING
Fill master cylinder reservoir with DOT 3 brake fluid. On
all models except Wrangler, compress slave cylinder plunger by pushing
release lever as far forward as possible.
Attach rubber hose to slave cylinder bleeder screw.
Immerse other end of hose in glass container 1/2 full of brake fluid.
Loosen bleeder screw and have an assistant depress clutch pedal.
Tighten bleeder screw and release pedal.
Repeat bleeding procedure until fluid entering container
is free of bubbles. DO NOT allow reservoir to run out of fluid during bleeding. Refill clutch master cylinder to level mark on reservoir.
TORQUE SPECIFICATIONS
TORQUE SPECIFICATIONS TABLE
Application Ft. Lbs. (N.m)
Cherokee, Comanche & Wagoneer
Bellhousing-to-Engine Bolts 28 (38)
Clutch Cover Bolts 23 (31)
Crossmember-to-Sill Bolts 30 (41)
Flywheel Bolts
4-Cylinder (1) 50 (68)
6-Cylinder 61-75 (83-102)
Master Cylinder Attaching Nuts 19 (26)
Rear Support-to-Engine Bolt 33 (45)
Slave Cylinder-to-Clutch
Housing Bolts 16 (22)
Transmission Drain Plug 27 (37)
Wrangler
Bellhousing-to-Engine Bolts 28 (38)
Clutch Cover Bolts
4-Cylinder 23 (31)
6-Cylinder 40 (54)
Crossmember-to-Sill Bolts 30 (41)
Master Cylinder Attaching Nuts 19 (26)
Rear Support-to-Crossmember Bolts 33 (45)
Transmission Drain Plug 27 (37)
(1) - Plus additional 60 degrees turn after reaching torque specification.
