1993 Jeep Cherokee
GENERAL TROUBLE SHOOTING
* PLEASE READ THIS FIRST *
NOTE: This is GENERAL information. This article is not intended
to be specific to any unique situation or individual vehicle configuration. The purpose of this Trouble Shooting information is to provide a list of common causes to problem symptoms. For model-specific Trouble Shooting, refer to SUBJECT, DIAGNOSTIC, or TESTING articles available in the section(s) you are accessing.
ACCESSORIES & ELECTRICAL
CHARGING SYSTEM TROUBLE SHOOTING
NOTE: This is GENERAL information. This article is not intended
to be specific to any unique situation or individual vehicle configuration. The purpose of this Trouble Shooting information is to provide a list of common causes to problem symptoms. For model-specific Trouble Shooting, refer to SUBJECT, DIAGNOSTIC, or TESTING articles available in the section(s) you are accessing.
BASIC CHARGING SYSTEM TROUBLE SHOOTING CHART
CONDITION
POSSIBLE CAUSE
CORRECTION
Vehicle Will Not Dead battery Start
Loose or corroded battery connections
Ignition circuit or switch malfunction
Check battery cells, alternator belt tension and alternator output
Check all charging system connections
Check and replace as necessary
Alternator Light Loose or worn alternator Stays On With drive belt Engine Running
Loose alternator wiring connections
Short in alternator light wiring
Defective alternator stator or diodes
Defective regulator
Check alternator drive tension and condition, See Belt Adjustment in TUNE-UP article in the TUNE-UP section
Check all charging system connections
See Indicator Warning Lights in STANDARD INSTRUMENTS in the ACCESSORIES & EQUIPMENT section
See Bench Tests in ALTERNATOR article
See Regulator Check in
ALTERNATOR article
Alternator Blown fuse Light Stays Off With Ignition Switch ON
See WIRING DIAGRAMS
Defective alternator
Defective indicator light bulb or socket
See Testing in ALTERNATOR article
See Indicator Warning Lights in STANDARD INSTRUMENTS in the ACCESSORIES & EQUIPMENT section
Alternator Short in alternator wiring Light Stays OFF With Ignition Switch ON
Defective rectifier bridge
See On-Vehicle Tests in ALTERNATOR article
See Bench Tests in ALTERNATOR article
Lights or Fuses Defective alternator wiring
Burn Out
Frequently
Defective regulator
Defective battery
See On-Vehicle Tests in ALTERNATOR article
See Regulator Check in ALTERNATOR article
Check and replace as necessary
Ammeter Gauge Loose or worn drive belt Shows Discharge
Defective wiring
Check alternator drive belt tension and condition. See Belt Adjustment in TUNE-UP article in the TUNE-UP section
Check all wires and wire connections
Defective alternator or regulator
See Bench Tests and On-Vehicle Tests in ALTERNATOR article
Defective ammeter, or improper ammeter wiring connection
See Testing in STANDARD INSTRUMENTS in the ACCESSORIES & EQUIPMENT section
Noisy Alternator
Loose drive pulley
Loose mounting bolts
Worn or dirty bearings
Tighten drive pulley attaching nut
Tighten all alternator mounting bolts
See Bearing Replacement ALTERNATOR article
Defective diodes or stator
See Bench Test in ALTERNATOR article
Battery Does Stay Charged
Loose or worn drive belt
Loose or corroded battery connections
Loose alternator connections
Defective alternator or battery
Add-on electrical accessories exceeding alternator capacity
Check alternator drive belt tension and condition. See Belt Adjustment in appropriate TUNE-UP article in the TUNE-UP section
Check all charging system connections
Check all charging system connections
See On-Vehicle Tests and Bench Tests in ALTERNATOR article
Install larger alternator
Battery Overcharged-Uses Too Much Water
Defective battery
Check alternator output and repair as necessary
Defective alternator
Excessive alternator voltage
See On-Vehicle Test and Bench Tests in ALTERNATOR article
Check alternator output and repair as necessary
IGNITION SYSTEM TROUBLE SHOOTING
NOTE: This is GENERAL information. This article is not intended
to be specific to any unique situation or individual vehicle configuration. The purpose of this Trouble Shooting information is to provide a list of common causes to problem symptoms. For model-specific Trouble Shooting, refer to SUBJECT, DIAGNOSTIC, or TESTING articles available in the section(s) you are accessing.
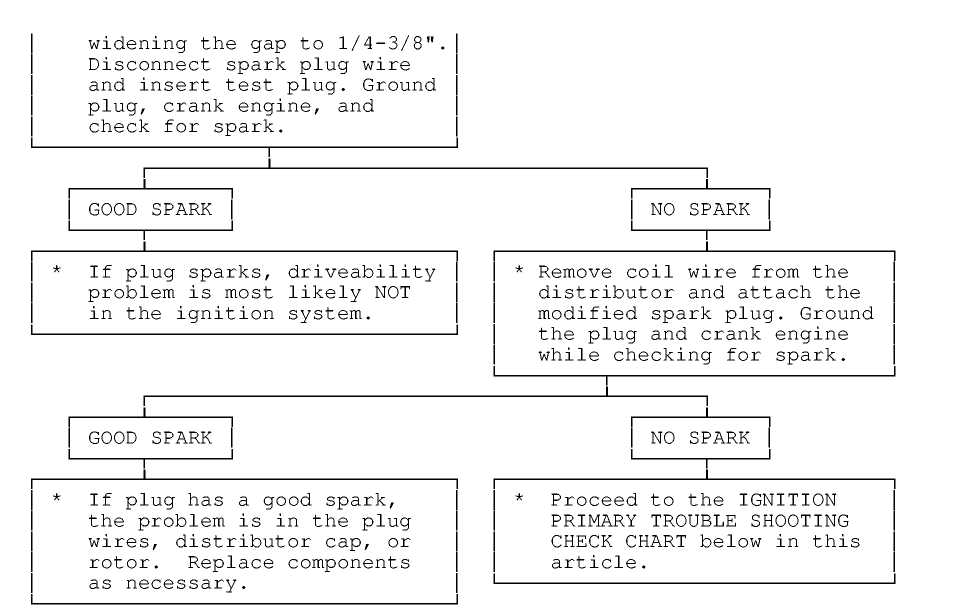
Ignition Secondary Trouble Shooting Chart
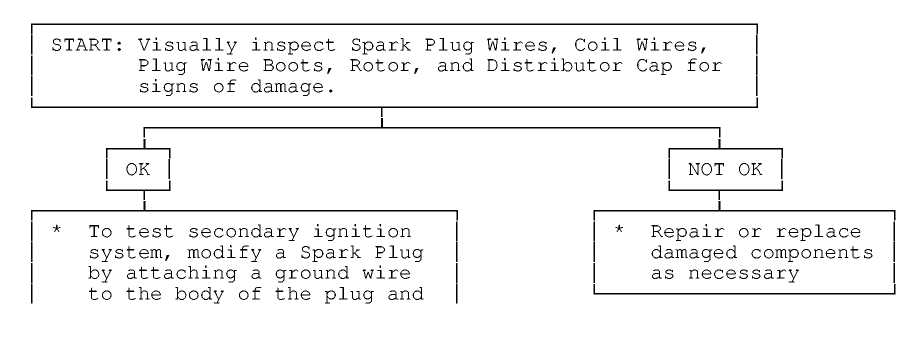
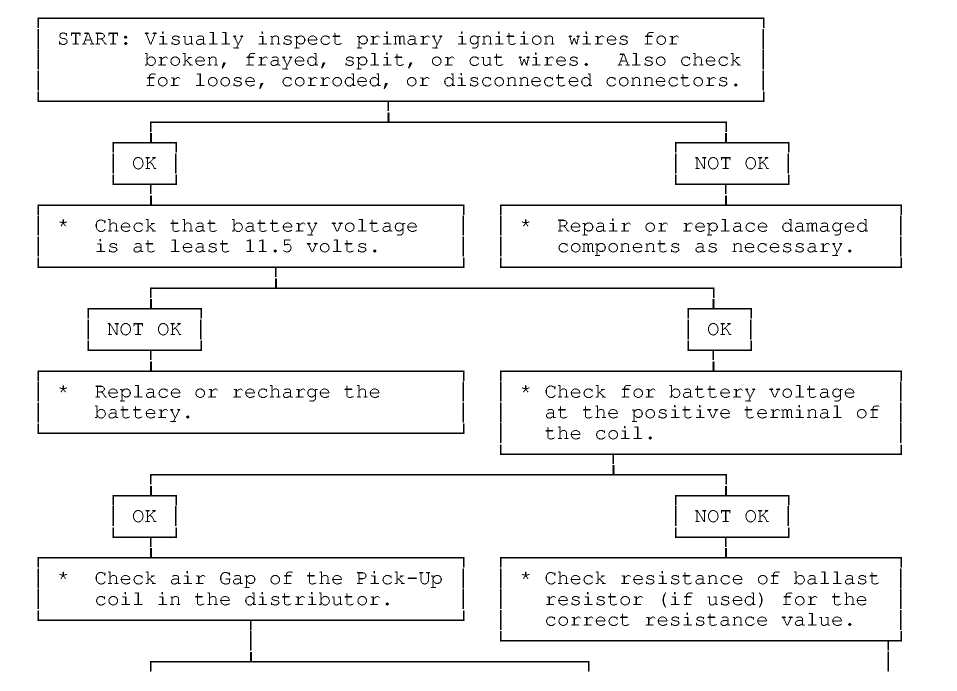
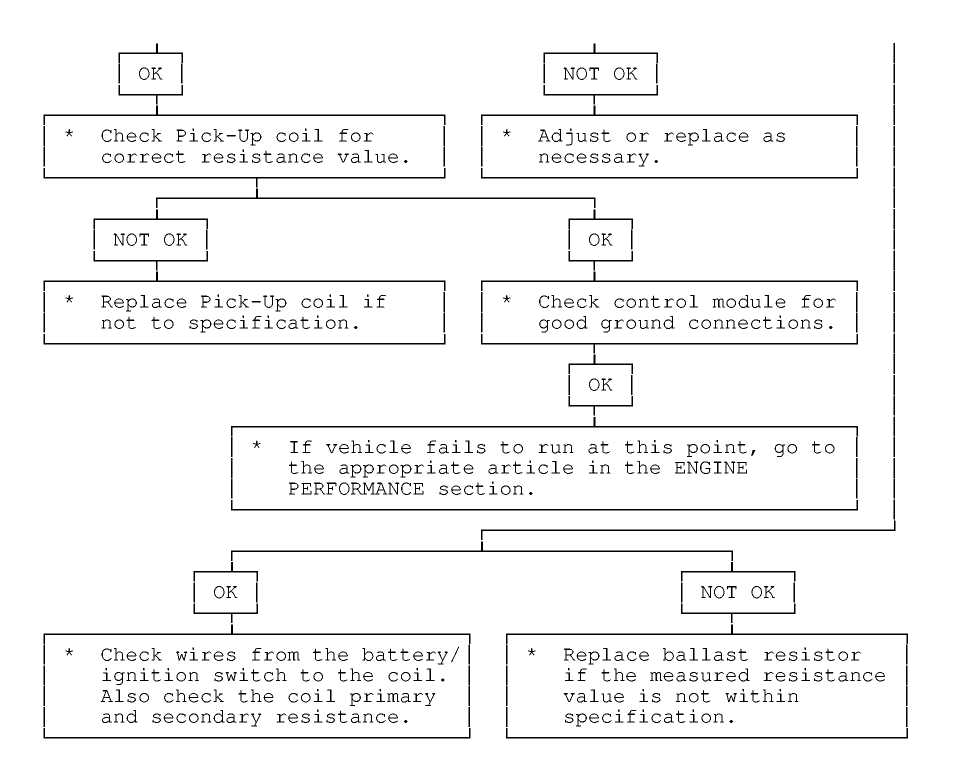
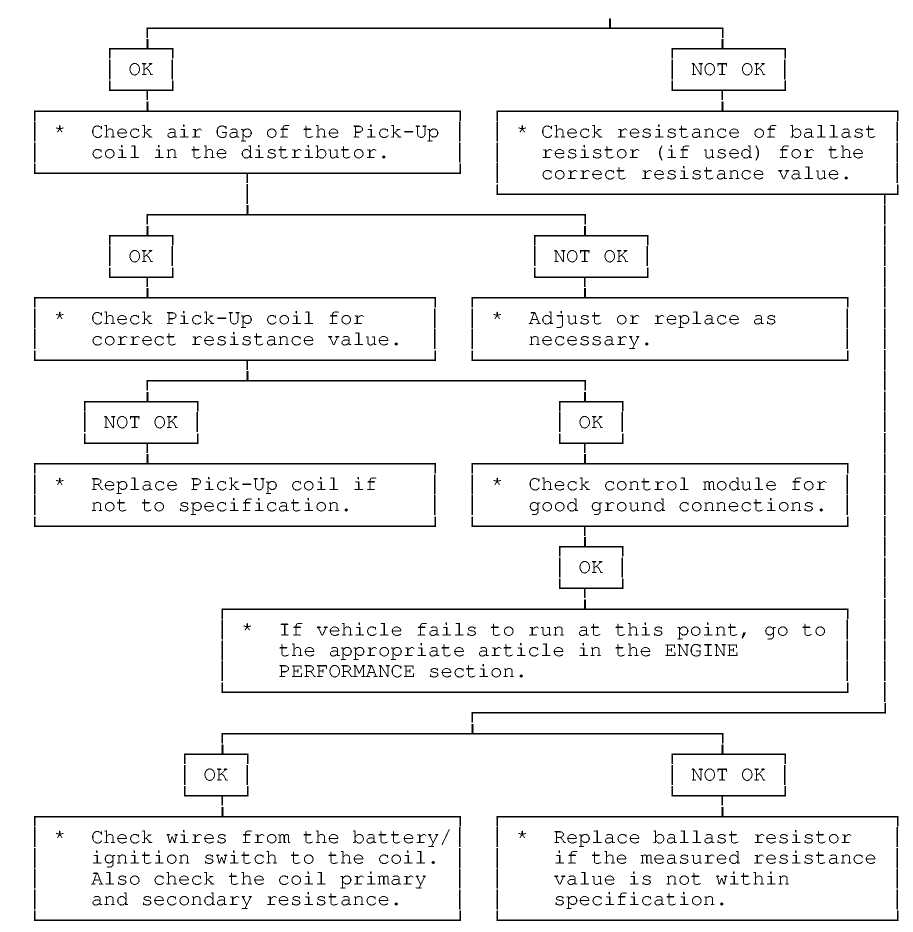
Ignition Primary Trouble Shooting Chart
STARTER TROUBLE SHOOTING
NOTE: This is GENERAL information. This article is not intended
to be specific to any unique situation or individual vehicle configuration. The purpose of this Trouble Shooting information is to provide a list of common causes to problem symptoms. For model-specific Trouble Shooting, refer to SUBJECT, DIAGNOSTIC, or TESTING articles available in the section(s) you are accessing.
BASIC STARTER TROUBLE SHOOTING CHART
CONDITION
POSSIBLE CAUSE
CORRECTION
Starter Fails to Operate
Dead battery or bad connections between starter and battery
Ignition switch faulty or misadjusted
Open circuit between starter switch ignition terminal on starter relay
Starter relay or starter defective
Check battery charge and all wires and connections to starter
Adjust or replace ignition switch
Check and repair wires and connections as necessary
See Testing in STARTER article
Open solenoid pull-in wire
See Testing in STARTER article
Starter Does Not Operate and Headlights Dim
Weak battery or dead cell
Loose or corroded battery connections
Internal ground in starter windings
Grounded starter fields
Armature rubbing on pole shoes
Charge or replace battery as necessary
Check that battery connections are clean and tight
See Testing in STARTER article
See Testing in STARTERS See STARTER article
Starter clutch slipping See STARTER article
Starter Turns but Engine Does Not Rotate
Broken clutch housing
Pinion shaft rusted or dry
Engine basic timing incorrect
Broken teeth on engine flywheel
See STARTER article See STARTER article
See Ignition Timing in TUNE-UP article
Replace flywheel and check for starter pinion gear damage
Starter Will Not Crank Engine
Faulty overrunning clutch
Broken clutch housing Broken flywheel teeth
Armature shaft sheared or reduction gear teeth stripped
Weak battery
Faulty solenoid
See STARTER article
See STARTER article
Replace flywheel and check for starter pinion gear damage
See STARTER article
Charge or replace battery as necessary
See On-Vehicle Tests in STARTER article
Poor grounds
Ignition switch faulty or misadjusted
Check all ground connections for tight and clean connections
Adjust or replace ignition switch as necessary
Starter Cranks Engine Slowly
Battery weak or defective
Charge or replace battery as necessary
Engine overheated
See ENGINE COOLING SYSTEM article
Engine oil too heavy
Check that proper viscosity oil is used
Poor battery-to-starter connections
Current draw too low or too high
Bent armature, loose pole shoes screws or worn bearings
Burned solenoid contacts Faulty starter
Check that all
between
battery and starter are
clean and tight
See Bench Tests in STARTER article
See STARTER article
Replace solenoid Replace starter
Starter Engages Engine Only Momentarily
Engine timing too far advanced
Overrunning clutch not engaging properly
See Ignition Timing in TUNE-UP article
Replace overrunning clutch. See STARTER article
Broken starter clutch
Broken teeth on engine flywheel
Weak drive assembly thrust spring
Weak hold-in coil
See STARTER article
Replace flywheel and check starter pinion gear for damage
See STARTER article
See Bench Tests in STARTER article
Starter Drive Will Not Engage
Defective point assembly
Poor point assembly ground
See Testing in STARTER article
See Testing in STARTER article
Starter Relay Does Not Close
Defective pull-in coil
Dead battery Faulty wiring
Neutral safety switch faulty
Replace starter solenoid
Charge or replace battery as necessary
Check all wiring and connections leading to relay
Replace neutral safety switch
Starter relay faulty
Replace starter relay
Starter Drive Will Not Disengage
Starter motor loose on mountings
Worn drive end bushing
Damaged engine flywheel teeth
Drive yolk return spring broken or missing
Faulty ignition switch
Insufficient clearance between winding leads to solenoid terminal and main contact in solenoid
Starter clutch not disengaging
Ignition starter switch contacts sticking
Tighten starter attach bolts
See STARTER article
Replace flywheel and starter pinion gear for damage
Replace return spring
Replace ignition switch
Replace starter solenoid
Replace starter clutch
Replace ignition switch
Starter Relay Operates but Solenoid Does Not
Faulty solenoid switch, switch connections or
Broken lead or loose soldered connections
Check all wiring between relay and solenoid or replace relay or solenoid as necessary
Repair wire or wire connections as necessary
Solenoid Plunger Vibrates When Switch is Engaged
Weak battery
Solenoid contacts corroded
Faulty wiring
Broken connections inside switch cover
Open hold-in wire
Charge or replace battery as necessary
Clean contacts or replace solenoid
Check all wiring leading to solenoid
Repair connections or replace solenoid
Replace solenoid
Low Current Draw
Worn brushes or weak
Replace brushes or brush springs as necessary
High Pitched Whine During Cranking Before Engine Fires but Engine Fires and Cranks Normally
Distance too great between starter pinion and flywheel
Align starter or check that correct starter and flywheel are being used
High Pitched Whine After Engine
Distance too small between starter pinion and flywheel
Fires With Key released. Engine Fires and Cranks Normally
Flywheel runout contributes to the intermittent nature
AIR CONDITIONING & HEAT
AIR CONDITIONING TROUBLE SHOOTING
WARNING: This is GENERAL information. This article is not intended
to be specific to any unique situation or individual vehicle configuration. The purpose of this Trouble Shooting information is to provide a list of common causes to problem symptoms. For model-specific Trouble Shooting, refer to SUBJECT, DIAGNOSTIC, or TESTING articles available in the section(s) you are accessing.
BASIC AIR CONDITIONING TROUBLE SHOOTING CHART
CONDITION
POSSIBLE CAUSE
Compressor Not Working
Compressor clutch circuit open. Compressor clutch coil inoperative. Poor clutch ground connection. Fan belts loose.
Thermostatic switch inoperative. Thermostatic switch not adjusted. Ambient temperature switch open. Superheat fuse blown.
Excessive Noise or Vibration
Missing or loose mounting bolts. Bad idler pulley bearings. Fan belts not tightened correctly. Compressor clutch contacting body. Excessive system pressure. Compressor oil level low. Damaged clutch bearings. Damaged reed valves. Damaged compressor.
Insufficient or No Cooling; Compressor Working
Expansion valve inoperative.
Heater control valve stuck open.
Low system pressure.
Blocked condenser fins.
Blocked evaporator fins.
Vacuum system leak.
Vacuum motors inoperative.
Control cables improperly adjusted.
Restricted air inlet.
Mode doors binding.
Blower motor inoperative.
Temperature above system capacity.
HEATER SYSTEM TROUBLE SHOOTING
NOTE: This is GENERAL information. This article is not intended
to be specific to any unique situation or individual vehicle configuration. The purpose of this Trouble Shooting information is to provide a list of common causes to
problem symptoms. For model-specific Trouble Shooting, refer to DIAGNOSTIC, or TESTING articles available in the section(s) you are accessing.
BASIC HEATER SYSTEM TROUBLE SHOOTING CHART
CONDITION
POSSIBLE CAUSE
Insufficient, Erratic, or No Heat
Low Coolant Level
Incorrect thermostat.
Restricted coolant flow through
heater core.
Heater hoses plugged.
Misadjusted control cable.
Sticking heater control valve.
Vacuum hose leaking.
Vacuum hose blocked.
Vacuum motors inoperative.
Blocked air inlet.
Inoperative heater blower motor.
Oil residue on heater core fins.
Dirt on heater core fins.
Too Much Heat
Improperly adjusted cables. Sticking heater control valve. No vacuum to heater control valve. Temperature door stuck open.
Air Flow Changes During Acceleration
Vacuum system leak.
Bad check valve or reservoir.
Air From Defroster At All Times
Vacuum system leak.
Improperly adjusted control cables.
Inoperative vacuum motor.
Blower Does Not Operate Correctly
Blown fuse.
Blower motor windings open.
Resistors burned out.
Motor ground connection loose.
Wiring harness connections loose.
Blower motor switch inoperative.
Blower relay inoperative.
Fan binding or foreign object
in housing.
Fan blades broken or bent.
BRAKES
BRAKE SYSTEM TROUBLE SHOOTING
NOTE: This is GENERAL information. This article is not intended
to be specific to any unique situation or individual vehicle configuration. The purpose of this Trouble Shooting information is to provide a list of common causes to problem symptoms. For model-specific Trouble Shooting, refer to SUBJECT, DIAGNOSTIC, or TESTING articles available in the section(s) you are accessing.
BRAKE SYSTEM TROUBLE SHOOTING CHART
CONDITION
POSSIBLE CAUSE
CORRECTION
Brakes Pull Left
or Right Incorrect tire pressure
Front end out of alignment Mismatched tires
Restricted brake lines or hoses
Loose or malfunctioning caliper
Bent shoe or oily linings Malfunctioning rear brakes Loose suspension parts
Inflate tires to proper pressure
See WHEEL ALIGNMENT Check tires sizes
Check hose routing
See DISC BRAKES or BRAKE SYSTEM
See DRUM BRAKES or BRAKE SYSTEM
See DRUM, DISC BRAKES or BRAKE SYSTEM
See SUSPENSION
Noises Without Brakes Applied
Front linings worn out
Dust or oil on drums or rotors
Replace linings
See DRUM, DISC BRAKES or BRAKE SYSTEM
Noises With Brakes Applied
Insulator on outboard shoe damaged
See DISC BRAKES or BRAKE SYSTEM
Incorrect pads or linings Replace pads or linings Brake Rough, Chatters
or Pulsates Excessive lateral runout
Parallelism not to specifications
Wheel bearings not adjusted Rear drums out-of-round
Disc pad reversed, steel against rotor
Check rotor runout
Reface or replace rotor
See SUSPENSION
Reface or replace drums
Remove and reinstall pad
Excessive Pedal
Effort Malfunctioning power unit
Partial system failure Worn disc pad or lining Caliper piston stuck or
See POWER BRAKES or BRAKE SYSTEM
Check fluid and pipes Replace pad or lining
sluggish
See DISC BRAKES or BRAKE SYSTEM
Master cylinder piston stuck
See MASTER CYLINDERS or BRAKE SYSTEM
Brake fade due to incorrect pads for linings
Linings or pads glazed Worn drums
Replace pads or linings Replace pads or linings Reface or replace drums
Excessive Pedal Travel
Partial brake system failure Check fluid and pipes
Insufficient fluid in master cylinder
Air trapped in system
Rear brakes not adjusted
Bent shoe or lining
Plugged master cylinder cap
Improper brake fluid
See MASTER CYLINDERS or BRAKE SYSTEM
See BRAKE BLEEDING or BRAKE SYSTEM
See Adjustments in DRUM BRAKES or BRAKE SYSTEM
See DRUM BRAKES or BRAKE SYSTEM
See MASTER CYLINDERS or BRAKE SYSTEM
Replace brake fluid
Pedal Travel Decreasing
Compensating port plugged
Swollen cup in master cylinder
Master cylinder piston not returning
See MASTER CYLINDERS or BRAKE SYSTEM
See MASTER CYLINDERS or BRAKE SYSTEM
See MASTER CYLINDERS or BRAKE SYSTEM
Weak shoe retracting springs See DRUM BRAKES
BRAKE SYSTEM
Wheel cylinder piston sticking
See DRUM BRAKES or BRAKE SYSTEM
Dragging Brakes
Master cylinder pistons not returning
See MASTER CYLINDERS BRAKE SYSTEM
Restricted brake lines
or hoses
Incorrect parking brake
adjustment
Check line routing
See DRUM BRAKES BRAKE SYSTEM
Parking Brake cables frozen See DRUM BRAKES
BRAKE SYSTEM
Incorrect installation of inboard disc pad
Power booster output rod too long
Brake pedal not returning freely
Remove and replace correctly
See POWER BRAKE UNITS BRAKE SYSTEM
See DISC, DRUM BRAKES BRAKE SYSTEM
Brakes Grab or Uneven Braking Action
Malfunction of combination valve
Malfunction of power brake unit
Binding brake pedal
See CONTROL VALVE or BRAKE SYSTEM
See POWER BRAKE UNITS or BRAKE SYSTEM
See DISC, DRUM BRAKES or BRAKE SYSTEM
Pulsation or Roughness
Uneven pad wear caused by caliper
Uneven rotor wear
Drums out-of-round
See DISC BRAKES or BRAKE SYSTEM
See DISC BRAKES or BRAKE SYSTEM
Reface or replace drums
ENGINE MECHANICAL
COOLING SYSTEM TROUBLE SHOOTING
NOTE: This is GENERAL information. This article is not intended
to be specific to any unique situation or individual vehicle configuration. The purpose of this Trouble Shooting information is to provide a list of common causes to problem symptoms. For model-specific Trouble Shooting, refer to SUBJECT, DIAGNOSTIC, or TESTING articles available in the section(s) you are accessing.
COOLING SYSTEM TROUBLE SHOOTING
CONDITION
POSSIBLE CAUSE
CORRECTION
Overheating
Coolant Leak
A/C Condenser Fins Clogged Radiator Fins Clogged Thermostat Stuck Closed
Clogged Cooling System Passages
Fill/Pressure Test
System
Remove/Clean Condenser
Remove/Clean Radiator Replace Thermostat
Clean/Flush Cooling System
Water Pump Malfunction Fan Clutch Malfunction Retarded Ignition Timing Cooling Fan Malfunction
Cooling Fan Motor Malfunction
Cooling Fan Relay Malfunction
Faulty Radiator Cap Broken/Slipping Fan Belt Restricted Exhaust
Replace Water Pump Replace Fan Clutch Reset Ignition Timing
Test Cooling Fan/ Circuit
Test Fan Motor
Test Fan Relay Replace Radiator Cap Replace Fan Belt Repair Exhaust System
Corrosion
Impurities In Coolant
Clean/Flush System
Coolant Leakage
Damaged hose Leaky Water Pump Damaged Radiator Seam Leaky Thermostat Cover
Cylinder Head Problem Leaky Freeze Plugs
Replace Hose Replace Water Pump Replace/Repair Radiator
Replace Thermostat Cover
Check Head/Head Gasket Replace Freeze Plugs
Recovery System Inoperative
Loose and/or Defective Radiator Cap
Overflow Tube Clogged and/or Leaking
Recovery Bottle Vent Restricted
Replace Radiator Cap Repair Tube Clean Vent
No Heater Core Flow
Collapsed Heater Hose
Plugged Heater Core
Faulty Heater Valve
Replace Heater Hose
Clean/Replace Heater Core
Replace Heater Valve
GASOLINE ENGINE - MECHANICAL TROUBLE SHOOTING
NOTE: This is GENERAL information. This article is not intended
to be specific to any unique situation or individual vehicle configuration. The purpose of this Trouble Shooting information is to provide a list of common causes to problem symptoms. For model-specific Trouble Shooting, refer to SUBJECT, DIAGNOSTIC, or TESTING articles available
in the section(s) you are accessing. BASIC GASOLINE ENGINE - MECHANICAL TROUBLE SHOOTING CHART
CONDITION
POSSIBLE CAUSE
CORRECTION
Engine Lopes At Idle
Intake manifold-to-head
leaks
Blown head gasket
Worn timing gears, chain
or sprocket
Worn camshaft lobes
Overheated engine
Blocked crankcase vent
valve
Leaking EGR valve
Faulty fuel pump
Replace manifold
gasket, See ENGINES
Replace head gasket,
See ENGINES
Replace gears, chain or
sprocket
Replace camshaft, See
ENGINES
Check cooling system,
See COOLING
Remove restriction
Repair leak and/or replace valve Replace fuel pump
Engine Has Low Power
Leaking fuel pump
Excessive piston-to-bore
clearance
Sticking valves or weak
valve springs
Incorrect valve timing
Worn camshaft lobes Blown head gasket Clutch slipping
Engine overheating
Auto. Trans. pressure regulator valve faulty
Auto. Trans. fluid level too low
Improper vacuum diverter valve operation
Vacuum leaks Leaking piston rings
Repair leak and/or
replace fuel pump
Install larger pistons,
See ENGINES
Check valve train
components, See ENGINES
Reset valve timing, See
ENGINES
Replace camshaft, See
ENGINES
Replace head gasket.
See ENGINES.
Adjust pedal and/or
replace components, See
ENGINES
Check cooling system,
See COOLING
Replace pressure
regulator valve
Add fluid as necessary
Replace vacuum diverter
valve
Inspect vacuum system
and repair as required
Replace piston rings,
See ENGINES
Faulty High Speed Operation
Low fuel pump volume Leaking valves or worn Incorrect valve timing
Intake manifold restricted Worn distributor shaft
Replace fuel pump
Replace valves and/or
springs, See ENGINES
Reset valve timing,See
ENGINES
Remove restriction
Replace distributor
Faulty Acceleration
Improper fuel pump stroke
Remove pump and reset pump stroke
Incorrect ignition timing Leaking valves
Worn fuel pump diaphragm or piston
Reset ignition timing,
See TUNE-UP
Replace valves, See
ENGINES
Replace diaphragm or
piston
Intake Backfire Improper ignition timing
Faulty accelerator pump
discharge
Improper choke operation
Defective EGR valve Fuel mixture too lean
Choke valve initial clearance too large
Reset ignition timing,
See TUNE-UP
Replace accelerator
pump
Check choke and adjust
as required
Replace EGR valve
Reset air/fuel mixture,
See TUNE-UP
Reset choke valve
initial clearance
Exhaust Backfire Vacuum leak
Faulty vacuum diverter
valve
Faulty choke operation
Exhaust system leak
Inspect and repair
vacuum system
Replace vacuum diverter
valve
Check choke and adjust
as required
repair exhaust system
leak
Engine Detonation
Ignition timing too far
advanced
Faulty ignition system
Spark plugs loose or
faulty
Fuel delivery system
clogged
EGR valve inoperative
PCV system inoperative
Vacuum leaks
Excessive combustion chamber deposits
Leaking, sticking or broken valves
Reset ignition timing,
See TUNE-UP
Check ignition timing,
See TUNE-UP
Retighten or replace
plugs
Inspect lines, pump and
filter for clog
Replace EGR valve
Inspect and/or replace
hoses or valve
Check vacuum system and
repair leaks
Remove built-up
deposits
Inspect and/or replace
valves
External Oil Leakage
Fuel pump improperly seated or worn gasket
Oil pan gasket broken or
pan bent
Timing chain cover gasket
broken
Rear main oil seal worn
Oil pan drain plug not seated properly Camshaft bearing drain hole blocked Oil pressure sending switch leaking
Remove pump, replace
gasket and seat
properly
Straighten pan and
replace gasket
Replace timing chain
cover gasket
Replace rear main oil
seal
Remove and reinstall
drain plug
Remove restriction
Remove and reinstall sending switch
Excessive Oil Consumption
Worn valve stems or guides
Valve "O" ring seals
damaged
Plugged oil drain back holes
Improper PCV valve
operation
Engine oil level too high
Engine oil too thin
Valve stem oil deflectors
damaged
Incorrect piston rings
Piston ring gaps not
staggered
Insufficient piston ring
tension
Piston ring grooves or oil
return slots clogged
Piston rings sticking in
grooves
Piston ring grooves
excessively worn
Compression rings installed
upside down
Worn or scored cylinder
walls
Mismatched oil ring
expander and rail
Intake gasket dowels too
long
Excessive main or connecting
rod bearing clearance
Replace stems or guides, See ENGINES Replace "O" ring seals, See ENGINES Remove restrictions Replace PCV valve
Remove excess oil Replace thicker oil Replace oil deflectors
Replace piston rings,
See ENGINES
Reinstall piston rings,
See ENGINES
Replace rings, See
ENGINES
Replace piston rings,
See ENGINES
Replace piston rings,
See ENGINES
Replace piston and
rings, See ENGINES
Replace compression
rings correctly, See
ENGINES
Rebore cylinders or
replace block
Replace oil ring
expander and rail, See
ENGINES
Replace intake gasket
dowels
Replace main or
connecting rod
bearings, See ENGINES
No Oil Pressure
Low oil level
Oil pressure sender or
gauge broken
Oil pump malfunction
Oil pressure relief valve
sticking
Oil pump passages blocked
Oil pickup screen or tube
blocked
Loose oil inlet tube
Loose camshaft bearings
Internal leakage at oil passages
Add oil to proper level Replace sender or gauge
Remove and overhaul oil
pump, See ENGINES
Remove and reinstall
valve
Overhaul oil pump, See
ENGINES
remove restriction
Tighten oil inlet tube Replace camshaft bearings, See ENGINES Replace block or cylinder head
Low Oil Pressure
Low engine oil level Engine oil too thin
Excessive oil pump
clearance
Oil pickup tube or screen
blocked
Main, rod or cam bearing
clearance excessive
Add oil to proper level Remove and replace with thicker oil Reduce oil pump clearance, See ENGINES Remove restrictions
Replace bearing to reduce clearance, See
ENGINES
High Oil Pressure
Improper grade of oil Oil pressure relief valve stuck closed Oil pressure sender or gauge faulty
Replace with proper oil Eliminate binding
Replace sender or gauge
Noisy Main Bearings
Inadequate oil supply
Excessive main bearing
clearance
Excessive crankshaft end
play
Loose flywheel or torque
converter
Loose or damaged vibration
damper
Crankshaft journals
out-of-round
Excessive belt tension
Check oil delivery to
main bearings
Replace main bearings,
See ENGINES
Replace crankshaft, See
ENGINES
Tighten attaching bolts
Tighten or replace
vibration damper
Re-grind crankshaft
journals
Loosen belt tension
Noisy Connecting Excessive bearing clearance Replace bearing, See
Rods
or missing bearing
Crankshaft rod journal
out-of-round
Misaligned connecting rod
or cap
Incorrectly tightened rod
bolts
ENGINES
Re-grind crankshaft
journal
Remove rod or cap and
realign
Remove and re-tighten
rod bolts
Noisy Pistons and Rings
Excessive piston-to-bore
clearance
Bore tapered or out-of-round
Piston ring broken
Piston pin loose or seized
Connecting rods misaligned Ring side clearance too loose or tight Carbon build-up on piston
Install larger pistons,
See ENGINES
Rebore block
Replace piston rings,
See ENGINES
Replace piston pin, See
ENGINES
Realign connecting rods
Replace with larger or
smaller rings
Remove carbon
Noisy Valve Train
Worn or bent push rods
Worn rocker arms or bridged
pivots
Dirt or chips in valve
lifters
Excessive valve lifter
leak-down
Valve lifter face worn
Broken or cocked valve
springs
Too much valve stem-to-guide
clearance
Valve bent
Loose rocker arms
Excessive valve seat run-out
Replace push rods, See
ENGINES
Replace push rods, See
ENGINES
Remove lifters and
remove dirt/chips
Replace valve lifters,
See ENGINES
Replace valve lifters,
See ENGINES
replace or reposition
springs
Replace valve guides,
See ENGINES
Replace valve, See
ENGINES
Retighten rocker arms,
See ENGINES
Reface valve seats, See
ENGINES
Noisy Valves
Missing valve lock
Excessively worn camshaft
lobes
Plugged valve lifter oil
holes
Faulty valve lifter check
ball
Rocker arm nut installed
upside down
Valve lifter incorrect for
engine
Faulty push rod seat or
lifter plunger
Improper valve lash
Worn or dirty valve lifters
Worn valve guides
Excessive valve seat or
face run-out
Worn camshaft lobes
Loose rocker arm studs Bent push rods Broken valve springs
Install new valve lock
Replace camshaft, See
ENGINES
Eliminate restriction
or replace lifter
Replace lifter check
ball, See ENGINES
Remove and reinstall
correctly
Remove and replace
valve lifters
Replace plunger or push
rod
Re-adjust valve lash,
See ENGINES
Clean and/or replace
lifters
Replace valve guides,
See ENGINES
Reface seats or valve
face
Replace camshaft, See
ENGINES
Re-tighten rocker arm
studs, See ENGINES
Replace push rods, See
ENGINES
Replace valve springs,
See ENGINES
Burned,Sticking or Broken Valves
Broken Pistons/Rings
Weak valve springs or
warped valves
Improper lifter clearance
Worn guides or improper guide clearance Out-of-round valve seats or improper seat width Gum deposits on valve stems, seats or guides Improper spark timing
Undersize pistons Wrong piston rings
Out-of-round cylinder bore
Improper connecting rod
alignment
Excessively worn ring
grooves
Improperly assembled
piston pins
Insufficient ring gap
clearance
Engine overheating
Incorrect ignition timing
Replace valves and/or springs, See ENGINES Re-adjust clearance or replace lifters Replace valve guides, See ENGINES Re-grind valve seats
Remove deposits Re-adjust spark timing
Replace with larger pistons, See ENGINES Replace with correct rings, See ENGINES Re-bore cylinder bore Remove and realign connecting rods Replace pistons, See ENGINES
Re-assemble pin-to -piston, See ENGINES Install new rings, See ENGINES
Check cooling system Re-adjust ignition timing, See TUNE-UP
Excessive Exhaust Noise
Leaks at manifold to head, or to pipe Exhaust manifold
Replace manifold or pipe gasket Replace exhaust
cracked or broken
manifold, See ENGINES
ENGINE PERFORMANCE
CARBURETOR TROUBLE SHOOTING:
NOTE: This is GENERAL information. This article is not intended
to be specific to any unique situation or individual vehicle configuration. The purpose of this Trouble Shooting information is to provide a list of common causes to problem symptoms. For model-specific Trouble Shooting, refer to SUBJECT, DIAGNOSTIC, or TESTING articles available in the section(s) you are accessing.
BASIC COLD START SYMPTOMS TROUBLE SHOOTING CHART
CONDITION
POSSIBLE CAUSE
CORRECTION
Engine WonÆt Start
Choke not closing
Choke linkage bent
Check choke operation, see FUEL SYSTEMS
Check linkage, see FUEL SYSTEM
Engine Starts, Then Dies
Choke vacuum kick setting too wide
Fast idle RPM too low
Fast idle cam index incorrect
Check setting and adjust see, FUEL SYSTEMS
Reset RPM to specif┬Łication, see TUNE-UP
Reset fast idle cam index, see FUEL SYSTEMS
Vacuum leak
Low fuel pump outlet
Inspect vacuum system for leaks
Repair or replace pump, see FUEL SYSTEMS
Low carburetor fuel level
Check float setting see FUEL SYSTEM
Engine Quits Under Load
Choke vacuum kick setting incorrect
Fast idle cam index incorrect
Incorrect hot fast idle speed RPM
Reset vacuum kick setting,see FUEL SYSTEMS
Reset fast idle cam index, see FUEL SYSTEM
Reset fast idle RPM, see TUNE-UP
Engine Starts, Runs Up,Then Idles, Slowly With Black Smoke
Choke vacuum kick set too narrow
Fast idle cam index
Reset vacuum kick, see FUEL SYSTEMS
Reset fast idle cam
incorrect
Hot fast idle RPM too low
index, see FUEL SYSTEMS
Reset fast idle RPM, see TUNE-UP
BASIC HOT START SYMPTOMS TROUBLE SHOOTING CHART
CONDITION
POSSIBLE CAUSE
CORRECTION
Engine WonÆt Start
Engine flooded
Allow fuel to evaporate
BASIC COLD ENGINE DRIVEABILITY SYMPTOMS TROUBLE SHOOTING CHART
CONDITION
POSSIBLE CAUSE
CORRECTION
Engine Stalls in Choke vacuum kick setting
Gear incorrect
Reset choke vacuum kick, see FUEL SYSTEMS
Fast idle RPM incorrect
Reset fast idle RPM, see TUNE-UP
Fast idle cam index incorrect
Reset fast idle cam see FUEL SYSTEMS
Acceleration Sag or Stall
Defective choke control switch
Replace choke control switch
Choke vacuum kick setting incorrect
Reset choke vacuum kick see, FUEL SYSTEMS
Float level incorrect (too low)
Accelerator pump defective
Adjust float level, FUEL SYSTEMS
Repair or replace pump see FUEL SYSTEMS
Secondary throttles not closed
Inspect lockout adjustment,see FUEL SYSTEMS
Sag or Stall After Warmup
Defective choke control switch
Defective accelerator pump
Replace choke control switch, see FUEL SYSTEMS
Replace pump, see FUEL SYSTEMS
Float level incorrect (too low)
Adjust float level, see FUEL SYSTEMS
Backfiring & Black Smoke
Plugged heat crossover system
Remove restriction
BASIC WARM ENGINE DRIVEABILITY SYMPTOMS TROUBLE SHOOTING CHART
CONDITION
POSSIBLE CAUSE
CORRECTION
Hesitation With Small Amount of Gas Pedal Movement
Vacuum leak
Accelerator pump weak or inoperable
Float level setting too low
Metering rods sticking or binding
Carburetor idle or transfer system plugged
Frozen or binding heated air inlet
Inspect vacuum lines
Replace pump, see FUEL SYSTEMS
Reset float level, see,FUEL SYSTEMS
Inspect and/or replace rods, see FUEL SYSTEMS
Inspect system and remove restriction
Inspect heated air door for binding
Hesitation With Heavy Gas Pedal Movement
Defective accelerator pump
Replace pump, see FUEL SYSTEMS
Metering rod carrier sticking or binding
Large vacuum leak
Remove restriction
Inspect vacuum system and repair leak
Float level setting too low
Defective fuel pump, lines or filter
Air door setting incorrect
Reset float level, see FUEL SYSTEMS
Inspect pump, lines and filter
Adjust air door setting, see FUEL
DIESEL ENGINE TROUBLE SHOOTING
NOTE: This is GENERAL information. This article is not intended
to be specific to any unique situation or individual vehicle configuration. The purpose of this Trouble Shooting information is to provide a list of common causes to problem symptoms. For model-specific Trouble Shooting, refer to SUBJECT, DIAGNOSTIC, or TESTING articles available in the section(s) you are accessing.
NOTE: Diesel engines mechanical diagnosis is the same as gasoline engines for items such as noisy valves, bearings, pistons, etc. The following trouble shooting covers only items pertaining to diesel engines.
BASIC DIESEL ENGINE TROUBLE SHOOTING CHART
CONDITION
POSSIBLE CAUSE
CORRECTION
Engine WonÆt Crank
Bad battery connections or dead batteries
Check connections and/or replace
Bad starter connections or bad starter
batteries
Check connections
and/or replace
batteries
Engine Cranks Slowly, WonÆt Start
Bad battery connections or dead batteries
Engine oil too heavy
Check connections and/or replace batteries Replace engine oil
Engine Cranks Normally, But Will Not Start
Glow plugs not functioning
Glow plug control not
functioning
Fuel not injected into
cylinders
No fuel to injection pump
Fuel filter blocked Fuel tank filter blocked
Fuel pump not operating Fuel return system blocked No voltage to fuel solenoid
Incorrect or contaminated
fuel
Incorrect injection pump
timing
Low compression
Injection pump malfunction
Check glow plug system,
see FUEL SYSTEMS
Check controller, see
FUEL SYSTEMS
Check fuel injectors,
see FUEL SYSTEMS
Check fuel delivery
system
Replace fuel filter
Replace fuel tank
filter
Check pump operation
and/or replace pump
Inspect system and
remove restriction
Check solenoid and
connections
Replace fuel
Re-adjust pump timing, see FUEL SYSTEMS Check valves, pistons, rings, see ENGINES Inspect and/or replace injection pump
Engine Starts, Incorrect slow idle WonÆt Idle adjustment
Fast idle solenoid
malfunctioning
Fuel return system blocked
Glow plugs go off too soon
Injection pump timing
incorrect
No fuel to injection pump
Incorrect or contaminated
fuel
Low compression
Injection pump malfunction
Fuel solenoid closes in RUN position
Reset idle adjustment,
see TUNE-UP
Check solenoid and
connections
Check system and remove
restrictions
See glow plug diagnosis
in FUEL SYSTEMS
Reset pump timing, see
FUEL SYSTEMS
Check fuel delivery
system
Replace fuel
Check valves, piston, rings, see ENGINES Replace injection pump, see FUEL SYSTEMS Check solenoid and connections
Engines Starts/ Incorrect slow idle
Idles Rough W/out adjustment
Smoke or Noise Injection line fuel leaks
Fuel return system blocked
Reset slow idle, see
TUNE-UP
Check lines and
connections
Check lines and
connections
Air in fuel system
Incorrect or contaminated
fuel
Injector nozzle malfunction
Bleed air from system Replace fuel
Check nozzles, see FUEL SYSTEMS
Engines Starts and Idles Rough W/out Smoke or Noise, But Clears After Warm-Up
Injection pump timing
incorrect
Engine not fully broken in
Air in system
Injector nozzle malfunction
Reset pump timing, see
FUEL SYSTEMS
Put more miles on
engine
Bleed air from system
Check nozzles, see
FUEL SYSTEMS
Engine Idles Correctly, Misfires Above Idle
Blocked fuel filter
Injection pump timing
incorrect
Incorrect or contaminated
fuel
Replace fuel filter Reset pump timing, see FUEL SYSTEMS Replace fuel
Engine WonÆt Return To Idle
Fast idle adjustment
incorrect
Internal injection pump
malfunction
External linkage binding
Reset fast idle, see
TUNE-UP
Replace injection pump,
see FUEL SYSTEMS
Check linkage and
remove binding
Fuel Leaks On Ground
Loose or broken fuel line
Internal injection pump seal leak
Check lines and
connections
Replace injection pump,
see FUEL SYSTEMS
Cylinder Knocking Noise
Injector nozzles sticking
open
Very low nozzle opening
pressure
see
Test injectors,
FUEL SYSTEMS
Test injectors and/or
replace
Loss of Engine Power
Restricted air intake EGR valve malfunction Blocked or damaged exhaust system
Blocked fuel tank filter Restricted fuel filter
Block vent in gas cap
Tank-to-injection pump fuel
supply blocked
Blocked fuel return system
Incorrect or contaminated
fuel
Blocked injector nozzles
Low compression
Remove restriction Replace EGR valve Remove restriction and/or replace components Replace filter Remove restriction and/or replace filter Remove restriction and/or replace cap Check fuel lines and connections Remove restriction Replace fuel
Check nozzle for
blockage, see FUEL
SYSTEMS
Check valves, rings,
pistons, see ENGINES
Loud Engine Basic timing incorrect Noise With Black
Smoke
EGR valve malfunction Internal injection pump malfunction
Reset timing, see FUEL SYSTEMS Replace EGR valve Replace injection pump, see FUEL SYSTEMS
Incorrect injector pump housing pressure
Check pressure, see FUEL SYSTEMS
Engine Overheating
Cooling system leaks Belt slipping or damaged Thermostat stuck closed
Head gasket leaking
Check cooling system and repair leaks Check tension and/or replace belt Remove and replace thermostat, see ENGINE COOLING Replace head gasket
Oil Light on at Idle
Low oil pump pressure
Oil cooler or line restricted
Check oil pump operation, see ENGINES Remove restriction and/or replace cooler
Engine WonÆt Shut Off
Injector pump fuel solenoid does not return fuel valve to OFF position
Remove and check solenoid and replace if needed
Excessive Noise
Oil Leakage
VACUUM PUMP DIAGNOSIS
Loose pump-to-drive
assembly screws
Loose tube on pump assembly
Valves not functioning
properly
Loose end plug Bad seal crimp
Tighten screws
Tighten tube Replace valves
Tighten end plug Remove and re-crimp seal
FUEL INJECTION TROUBLE SHOOTING
NOTE: This is GENERAL information. This article is not intended
to be specific to any unique situation or individual vehicle configuration. The purpose of this Trouble Shooting information is to provide a list of common causes to problem symptoms. For model-specific Trouble Shooting, refer to SUBJECT, DIAGNOSTIC, or TESTING articles available in the section(s) you are accessing.
BASIC FUEL INJECTION TROUBLE SHOOTING CHART
CONDITION
POSSIBLE CAUSE
CORRECTION
Engine WonÆt Start (Cranks Normally)
Cold start valve inoperative
Poor connection;vacuum or wiring
Contaminated fuel
Defective fuel pump relay or circuit
Battery too low
Test valve and circuit
Check vacuum and
electrical
connections
Test fuel for water or alcohol
Test relay and wiring
Charge and test battery
Low fuel pressure
No distributor reference pulses
Open coolant temperature sensor circuit
Shorted W.O.T. switch in T.P.S.
Defective ECM
Fuel tank residual pressure valve leaks
Test pressure regul┬Łator and fuel pump, check for restricted lines and filters
Repair ignition system as necessary
Test sensor and wiring
Disconnect W.O.T. switch, engine should start
Replace ECM
Test for fuel pressure drop after shut down
Hard Starting
Disconnected hot air tube to air cleaner
Defective Idle Air Control (IAC) valve
Shorted, open or misadjusted T.P.S.
EGR valve open
Poor Oxygen sensor signal
Incorrect mixture from PCV system
Reconnect tube and test control valve
Test valve operation and circuit
Test and adjust or replace T.P.S.
Test EGR valve and control circuit
Test for shorted or circuit
Test PCV for flow, check sealing of oil filter cap
Poor High Speed Operation
Low fuel pump volume
Poor MAP sensor signal
Poor Oxygen sensor signal
Open coolant temperature sensor circuit
Faulty ignition operation
Faulty pump or restricted fuel lines or filters
Test MAP sensor, vacuum hose and wiring
Test for shorted or open sensor or circuit
Test sensor and wiring
Check wires for cracks or poor con┬Łnections, test secondary voltage with oscilloscope
Contaminated fuel
Test fuel for water
or alcohol
Intermittent ECM ground
Restricted air cleaner Restricted exhaust system
Poor MAF sensor signal Poor VSS signal
Test ECM ground connection for resistance
Replace air cleaner
Test for exhaust manifold back pressure
Check leakage between sensor and manifold
If tester for ALCL hook-up is available check that VSS reading matches speedometer
Ping or Knock on Acceleration
Poor Knock sensor signal
Poor Baro sensor signal
Improper ignition timing
Check for engine overheating problems
Test for shorted or open sensor or circuit
Test for shorted or open sensor or circuit
See VEHICLE EMISSION CONTROL LABEL (where applicable)
Low coolant, loose belts or electric cooling fan inoperative
NOTE: For additional electronic fuel injection trouble shooting information, see the appropriate article in the ENGINE PERFORMANCE section (not all vehicles have Computer Engine Control articles). Information is provided there for diagnosing fuel system problems on vehicles with electronic fuel injection.
IGNITION SYSTEM TROUBLE SHOOTING
NOTE: This is GENERAL information. This article is not intended
to be specific to any unique situation or individual vehicle configuration. The purpose of this Trouble Shooting information is to provide a list of common causes to problem symptoms. For model-specific Trouble Shooting, refer to SUBJECT, DIAGNOSTIC, or TESTING articles available in the section(s) you are accessing.
Ignition Secondary Trouble Shooting Chart

STARTER TROUBLE SHOOTING
NOTE: This is GENERAL information. This article is not intended
to be specific to any unique situation or individual vehicle configuration. The purpose of this Trouble Shooting information is to provide a list of common causes to problem symptoms. For model-specific Trouble Shooting, refer to SUBJECT, DIAGNOSTIC, or TESTING articles available in the section(s) you are accessing.
BASIC STARTER TROUBLE SHOOTING CHART
CONDITION
POSSIBLE CAUSE
CORRECTION
Starter Fails to Operate
Dead battery or bad connections between starter and battery
Check battery charge and all wires and connections to starter
Ignition switch faulty or misadjusted
Open circuit between starter switch ignition terminal on starter relay
Starter relay or starter defective
Open solenoid pull-in wire
Adjust or replace ignition switch
Check and repair wires and connections as necessary
See Testing in STARTER article
See Testing in STARTER article
Starter Does Not Operate and Headlights Dim
Weak battery or dead cell
Loose or corroded battery connections
Internal ground in starter windings
Grounded starter fields
Armature rubbing on pole shoes
Charge or replace battery as necessary
Check that battery connections are clean and tight
See Testing in STARTER article
See Testing in STARTERS See STARTER article
Starter Turns but Engine Does Not Rotate
Starter clutch slipping
Broken clutch housing
Pinion shaft rusted or dry
Engine basic timing incorrect
Broken teeth on engine flywheel
See STARTER article
See STARTER article See STARTER article
See Ignition Timing in TUNE-UP article
Replace flywheel and check for starter pinion gear damage
Starter Will Not Crank Engine
Faulty overrunning clutch
Broken clutch housing Broken flywheel teeth
Armature shaft sheared or reduction gear teeth stripped
Weak battery
Faulty solenoid
See STARTER article
See STARTER article
Replace flywheel and check for starter pinion gear damage
See STARTER article
Charge or replace battery as necessary
See On-Vehicle Tests in STARTER article
Poor grounds
Check all ground
connections for tight and clean connections
Ignition switch faulty or misadjusted
Adjust or replace ignition switch as necessary
Starter Cranks Engine Slowly
Battery weak or defective
Engine overheated
Charge or replace battery as necessary
See ENGINE COOLING SYSTEM article
Engine oil too heavy
Check that proper viscosity oil is used
Poor battery-to-starter connections
Current draw too low or too high
Bent armature, loose pole shoes screws or worn bearings
Burned solenoid contacts Faulty starter
Check that all
between
battery and starter are
clean and tight
See Bench Tests in STARTER article
See STARTER article
Replace solenoid Replace starter
Starter Engages Engine Only Momentarily
Engine timing too far advanced
Overrunning clutch not engaging properly
See Ignition Timing in TUNE-UP article
Replace overrunning clutch. See STARTER article
Broken starter clutch
Broken teeth on engine flywheel
Weak drive assembly thrust spring
Weak hold-in coil
See STARTER article
Replace flywheel and check starter pinion gear for damage
See STARTER article
See Bench Tests in STARTER article
Starter Drive Will Not Engage
Defective point assembly
Poor point assembly ground
Defective pull-in coil
See Testing in STARTER article
See Testing in STARTER article
Replace starter solenoid
Starter Relay
Dead battery
Charge or replace
Does Not Close
battery as necessary
Faulty wiring
Neutral safety switch faulty
Starter relay faulty
Check all wiring and connections leading to relay
Replace neutral safety switch
Replace starter relay
Starter Drive Will Not Disengage
Starter motor loose on mountings
Worn drive end bushing
Damaged engine flywheel teeth
Drive yolk return spring broken or missing
Faulty ignition switch
Insufficient clearance between winding leads to solenoid terminal and main contact in solenoid
Tighten starter attach bolts
See STARTER article
Replace flywheel and starter pinion gear for damage
Replace return spring
Replace ignition switch
Replace starter solenoid
Starter clutch not disengaging
Ignition starter switch contacts sticking
Replace starter clutch
Replace ignition switch
Starter Relay Operates but Solenoid Does Not
Faulty solenoid switch, switch connections or
Broken lead or loose soldered connections
Check all wiring between relay and solenoid or replace relay or solenoid as necessary
Repair wire or wire connections as necessary
Solenoid Plunger Vibrates When Switch is Engaged
Weak battery
Solenoid contacts corroded
Faulty wiring
Broken connections inside switch cover
Open hold-in wire
Charge or replace battery as necessary
Clean contacts or replace solenoid
Check all wiring leading to solenoid
Repair connections or replace solenoid
Replace solenoid
Low Current Draw Worn brushes or weak
Replace brushes or brush springs as necessary
High Pitched Whine Distance too great
During Cranking Before Engine Fires but Engine Fires and Cranks Normally
between starter pinion and flywheel
Align starter or check that correct starter and flywheel are being used
High Pitched Distance too small between Whine After Engine starter pinion and flywheel Fires With Key Flywheel runout contributes released. Engine to the intermittent nature Fires and Cranks Normally
TUNE-UP TROUBLE SHOOTING - GAS ENGINE VEHICLES
NOTE: This is GENERAL information. This article is not intended
to be specific to any unique situation or individual vehicle configuration. The purpose of this Trouble Shooting information is to provide a list of common causes to problem symptoms. For model-specific Trouble Shooting, refer to SUBJECT, DIAGNOSTIC, or TESTING articles available in the section(s) you are accessing.
BASIC SPARK PLUG TROUBLE SHOOTING CHARTS
CONDITION
POSSIBLE CAUSE
CORRECTION
Normal Spark Plug Condition
Light Tan or Gray deposits No Action
Electrode not burned or No Action fouled
Gap tolerance not changed
No Action
Cold Fouling or Carbon Deposits
Overrich air/fuel mixture
Faulty choke
Clogged air filter
Incorrect idle speed or dirty carburetor
Faulty ignition wires
Prolonged operation at idle
Sticking valves or worn valve guide seals
Adjust air/fuel mixture, see ENGINE PERFORMANCE section
Replace choke assembly, see ENGINE PERFORMANCE section
Clean and/or replace air filter
Reset idle speed and/ or clean carburetor
Replace ignition wiring
Shut engine off during long idle
Check valve train
Wet Fouling
or Oil Deposits
Worn rings and pistons
Install new rings and pistons
Excessive cylinder wear
Excessive valve guide clearance
Rebore or replace block
Worn or loose bearing
Gap Bridged
Deposits in combustion chamber becoming fused to electrode
Clean combustion chamber of deposits
Blistered Electrode
Engine overheating Wrong type of fuel
Loose spark plugs
Over-advanced ignition timing
Check cooling system
Replace with correct fuel
Retighten spark plugs
Reset ignition timing see ENGINE PERFORMANCE
Pre-Ignition or Incorrect type of fuel Melted Electrodes
Incorrect ignition timing
Replace with correct fuel
Reset ignition timing see ENGINE PERFORMANCE
Burned valves Engine Overheating
Wrong type of spark plug, too hot
Replace valves Check cooling system
Replace with correct spark plug, see ENGINE PERFORMANCE
Chipped Insulators
Severe detonation
Improper gapping procedure
Check for over-advanced timing or combustion
Re-gap spark plugs
Rust Colored Deposits
Additives in unleaded fuel
Try different fuel brand
Water In Combus┬Łtion Chamber
Blown head gasket or cracked head
Repair or replace head or head gasket
NOTE: Before diagnosing an electronic ignition system, ensure that all wiring is connected properly between distributor, wiring connector and spark plugs. Ignition problem will show up either as: Engine Will Not Start or Engine Runs Rough.
BASIC ELECTRONIC IGNITION TROUBLE SHOOTING CHARTS
CONDITION
POSSIBLE CAUSE
CORRECTION
Engine WonÆt Start
Open circuit between distributor and bulkhead connector
Repair circuit
Open circuit between bulkhead connector and
Repair circuit
ignition switch
Open circuit between ignition switch and starter solenoid
Repair circuit
Engine Runs Rough
Fuel lines leaking or clogged
Initial timing incorrect
Centrifugal advance malfunction
Defective spark plugs or wiring
Tighten fitting, remove restriction
Reset ignition timing see ENGINE PERFORMANCE
Repair distributor advance
Replace plugs or plug wiring
Component Failure Spark arc-over on cap,
rotor or coil
Defective pick-up coil Defective ignition coil Defective vacuum unit Defective control module
Replace cap, rotor or or coil
Replace pick-up coil Replace ignition coil Replace vacuum unit Replace control module
BASIC ELECTRONIC IGNITION TROUBLE SHOOTING CHARTS - USING OSCILLOSCOPE PATTERNS
CONDITION
POSSIBLE CAUSE
CORRECTION
Firing Voltage Retarded ignition timing Lines are the Same, but Abnormally High
Fuel mixture too lean
High resistance in coil wire
Corrosion in coil tower terminal
Corrosion in distributor coil terminal
Reset ignition timing, see ENGINE PERFORMANCE section
Readjust carburetor, see ENGINE PERFORMANCE
Replace coil wire
Clean and/or replace coil
Clean and/or replace distributor cap
Firing Voltage Fuel mixture too rich Lines are the Same but Abnormally Low
Breaks in coil wire causing
arcing
Cracked coil tower causing arcing
Low coil output
Low engine compression
Readjust carburetor, see ENGINE PERFORMANCE
Replace coil wire
Replace coil
Replace coil Determine cause and
repair
One or More, But Carburetor idle mixture
Not All Firing not balanced
Voltage Lines are
Higher Than Others EGR valve stuck open
High resistance in spark plug wires
Cracked or broken spark plug insulator
Intake vacuum leak Defective spark plugs
Corroded spark plug terminals
Readjust carburetor, see ENGINE PERFORMANCE
Clean and/or replace valve
Replace spark plug wires
Replace spark plugs
Repair leak Replace spark plugs Replace spark plugs
One or More, But Curb idle mixture not Not All Firing balanced Voltage Lines Are
Lower Than Others Breaks in plug wires
causing arcing
Cracked coil tower causing arcing
Low compression
Defective spark plugs Corroded spark plugs
Readjust carburetor, see ENGINE PERFORMANCE
Replace plug wires
Replace coil
Determine cause and repair
Replace spark plugs Replace spark plugs
Cylinders Not Firing
Cracked distributor cap terminals
Shorted spark plug wire
Mechanical problem in engine
Defective spark plugs Spark plugs fouled
Replace distributor cap
Determine cause and repair
Determine cause and repair
Replace spark plugs Replace spark plugs
BASIC DRIVEABILITY PROBLEMS TROUBLE SHOOTING TABLE
CONDITION
POSSIBLE CAUSE
CORRECTION
Hard Starting
Binding carburetor linkage Binding choke linkage Binding choke piston Restricted choke vacuum
Eliminate binding Eliminate binding Eliminate binding
Check vacuum lines for blockage
Worn or dirty needle valve and seat
Float sticking
Incorrect choke adjustment
Defective coil Improper spark plug gap Incorrect ignition timing
Clean carburetor, see ENGINE PERFORMANCE
Readjust or replace float see the ENGINE PERFORMANCE section
Reset choke adjustment see ENGINE PERFORMANCE
Replace coil Regap spark plugs
Reset ignition timing see ENGINE PERFORMANCE
Detonation
Over-advanced ignition timing
Defective spark plugs Fuel lines clogged EGR system malfunction
PCV system malfunction Vacuum leaks
Loose fan belts
Restricted airflow
Vacuum advance malfunction
Reset ignition timing see ENGINE PERFORMANCE
Replace spark plugs Clean fuel lines
Check and repair EGR system
Repair PCV system
Check and repair vacuum system
Tighten or replace fan belts, see ENGINE PERFORMANCE
Remove restriction
Check distributor operation
Dieseling
Binding carburetor linkage Binding throttle linkage
Binding choke linkage or fast idle cam
Defective idle solenoid Improper base idle speed Incorrect ignition timing
Incorrect idle mixture setting
Eliminate binding Eliminate blinding Eliminate binding
Replace idle solenoid see ENGINE PERFORMANCE
Reset idle speed, see see ENGINE PERFORMANCE
Reset ignition timing see ENGINE PERFORMANCE
Reset idle mixture, see ENGINE PERFORMANCE
Faulty Acceleration
Incorrect ignition timing
Reset ignition timing see ENGINE PERFORMANCE
Engine cold and choke too lean
Defective spark plugs Defective coil
Adjust choke and allow engine to warm-up
Replace spark plugs Replace coil
Faulty Low Speed Operation
Clogged idle transfer slots
Restricted idle air bleeds and passages
Clogged air cleaner Defective spark plugs Defective ignition wires
Defective distributor cap
Clean idle transfer slots, see FUEL
Disassemble and clean carburetor, see FUEL
Replace air filter Replace spark plugs
Replace ignition wire see ENGINE PERFORMANCE
Replace distributor cap
Faulty High Speed Incorrect ignition timing Operation
Defective distributor centrifugal advance
Defective distributor vacuum advance
Incorrect spark plugs or plug gap
Faulty choke operation
Clogged vacuum passages
Improper size or clogged main jet
Restricted air cleaner
Defective distributor cap, rotor or coil
Reset ignition timing see ENGINE PERFORMANCE
Replace advance mechanism
Replace advance unit
Check gap and/or replace spark plugs
Check choke and repair as required
Remove restrictions
Check jet size and clean, see FUEL
Check filter and replace as necessary
Replace cap, rotor or coil
Misfire at All Speeds
Defective spark plugs
Replace spark plugs
Defective spark plug wires
Defective distributor cap, rotor, or coil
Cracked or broken vacuum hoses
Replace spark plug wires
Replace cap, rotor, or coil
Replace vacuum hoses
Vacuum leaks
Fuel lines clogged
Repair vacuum leaks Remove restriction
Hesitation
Cracked or broken vacuum hoses
Vacuum leaks
Binding carburetor linkage
Binding throttle linkage
Binding choke linkage or fast idle cam
Improper float setting
Cracked or broken ignition wires
Replace vacuum hoses
Repair Vacuum leaks Eliminate binding Eliminate binding Eliminate binding
Readjust float setting, see FUEL
Replace ignition wires
Rough idle, Missing or Stalling
Incorrect curb idle or fast idle speed
Incorrect basic timing
Improper idle mixture adjustment
Improper feedback system operation
Incorrect spark plug gap
Moisture in ignition components
Loose or broken ignition wires
Damaged distributor cap or or rotor
Faulty ignition coil
Fuel filter clogged or worn
Damaged idle mixture screw
Improper fast idle cam adjustment
Improper EGR valve operation Faulty PCV valve air flow
Choke binding or improper choke setting
Reset idle speed, see see ENGINE PERFORMANCE
Reset ignition timing see ENGINE PERFORMANCE
Reset idle mixture, see ENGINE PERFORMANCE
Check feedback system see ENGINE PERFORMANCE
Reset spark plug gap, see ENGINE PERFORMANCE
Dry components
Replace ignition wires
Replace distributor cap or rotor
Replace ignition coil Replace fuel filter
Replace idle mixture screw, see FUEL
Reset fast idle cam adjustment, see TUNE-see ENGINE PERFORMANCE
Replace EGR valve Replace PCV valve
Reset choke or eliminate binding
Vacuum leak
Repair vacuum leak
Improper float bowl fuel level
Clogged air bleed or idle passages
Clogged or worn air cleaner filter
Faulty choke vacuum diaphragm
Exhaust manifold heat valve inoperative
Improper distributor spark advance
Leaking valves or valve components
Improper carburetor mounting
Excessive play in distributor shaft
Loose or corroded wiring connections
Reset float adjustment, see FUEL
Clean carburetor passages, see FUEL
Replace air filter
Replace diaphragm,
see ENGINE PERFORMANCE
Replace heat valve
Check distributor operation
Check and repair valvetrain
Remove and remount carburetor
Replace distributor
Repair or replace as required
Engine Surges
Improper PCV valve airflow Vacuum leaks Clogged air bleeds EGR valve malfunction
Restricted air cleaner filter
Cracked or broken vacuum hoses
Cracked or broken ignition wires
Vacuum advance malfunction
Defective or fouled spark plugs
Replace PCV valve Repair vacuum leaks Remove restriction Replace EGR valve Replace air filter
Replace vacuum hoses
Replace ignition wires
Check unit and replace as necessary
Replace spark plugs
Ping or Spark Knock
Incorrect ignition timing
Distributor centrifugal or vacuum advance malfunction
Reset ignition timing see ENGINE PERFORMANCE
Check operation and replace as necessary
Carburetor setting too lean Readjust mixture
Vacuum leak
EGR valve malfunction
setting, see ENGINE PERFORMANCE
Eliminate vacuum leak Replace EGR valve
Poor Gasoline Mileage
Cracked or broken vacuum hoses
Vacuum leaks
Defective ignition wires
Incorrect choke setting
Defective vacuum advance Defective spark plugs
Binding carburetor power piston
Dirt in carburetor jets Incorrect float adjustment Defective power valve Incorrect idle speed
Replace vacuum hoses
Repair vacuum leaks Replace wires
Readjust setting, see ENGINE PERFORMANCE
Replace vacuum advance Replace spark plugs Eliminate binding
Clean and/or replace jets
Readjust float setting, see FUEL
Replace power valve, see ENGINE PERFORMANCE
Readjust idle speed
Engine Stalls
Improper float level
Leaking needle valve and seat
Vacuum leaks
Readjust float level
Replace needle valve and seat
Eliminate vacuum leaks
VACUUM PUMP - DIESEL TROUBLE SHOOTING
NOTE: This is GENERAL information. This article is not intended
to be specific to any unique situation or individual vehicle configuration. The purpose of this Trouble Shooting information is to provide a list of common causes to problem symptoms. For model-specific Trouble Shooting, refer to SUBJECT, DIAGNOSTIC, or TESTING articles available in the section(s) you are accessing.
NOTE: Diesel engines mechanical diagnosis is the same as gasoline engines for items such as noisy valves, bearings, pistons, etc. The following trouble shooting covers only items pertaining to diesel engines.
VACUUM PUMP (DIESEL) TROUBLE SHOOTING CHART
CONDITION
POSSIBLE CAUSE
CORRECTION
Excessive Noise
Loose pump-to-drive
assembly screws
Loose tube on pump assembly
Valves not functioning
properly
Tighten screws
Tighten tube Replace valves
Oil Leakage
Loose end plug Bad seal crimp
Tighten end plug Remove and re-crimp seal
MANUAL TRANSMISSION
MANUAL TRANSMISSION TROUBLE SHOOTING
NOTE: This is GENERAL information. This article is not intended
to be specific to any unique situation or individual vehicle configuration. The purpose of this Trouble Shooting information is to provide a list of common causes to problem symptoms. For model-specific Trouble Shooting, refer to SUBJECT, DIAGNOSTIC, or TESTING articles available in the section(s) you are accessing.
MANUAL TRANSMISSION/TRANSAXLE TROUBLE SHOOTING
Condition
Possible Cause
Noisy In Forward Gears
.Low gear oil level, .Loose bell housing bolts, .Worn bearings or gears
Clunk On Deceleration (FWD Only)
.Loose engine mounts, .Worn inboard CV joints, .Worn differential pinion shaft, .Side gear hub counterbore in case worn oversize
Gear Clash When Shifting Forward Gears
.Clutch Out Of Adjustment, .Shift linkage damaged or out of adjustment, .Gears or synchronizers damaged, .Low gear oil level
Transmission Noisy When Moving (RWD Only) Quiet In Neutral With Clutch Engaged
.Worn rear outputshaft bearing
Gear Rattle
.Worn bearings, .Wrong gear oil, .Low gear oil, .Worn gears
Steady Ticking At Idle (Increases With RPM)
.Broken tooth on gear
Gear Clash When Shifting Forward Gears
.Worn or broken synchronizers
Loud Whine In Reverse
.Normal condition (1)
Noise When Stepping On Clutch
.Bad release bearing, .Worn pilot bearing
Ticking Or Screeching As Clutch Is Engaged
.Faulty release bearing, .Uneven pressure plate fingers
Click Or Snap When Clutch Is Engaged
.Worn clutch fork, .Worn or broken front bearing retainer
Transmission Shifts Hard
.Clutch not releasing, .Shift mechanism binding, .Clutch installed backwards
Will Not Shift Into One Gear, Shifts Into All Others
.Bent shift fork, .Worn detent balls
Locked Into Gear, Cannot Shift
.Clutch adjustment, .Worn detent balls
Transmission Jumps Out Of Gear
.Pilot bearing worn,
.Bent shift fork,
.Worn gear teeth or face
.Excessive gear train end play
.Worn synchronizers
.Missing detent ball spring
.Shift mechanism worn or out of
adjustment .Engine or transmission mount
bolts loose or out of adjustment .Transmission not aligned
Shift Lever Rattle
.Worn shift lever or detents
.Worn shift forks
.Worn synchronizers sleeve
Shift Lever Hops Under Acceleration
.Worn engine or transmission mounts
(1) - Most units use spur cut gears in reverse and are noisy
POWERTRAIN
CLUTCH TROUBLE SHOOTING
NOTE: This is GENERAL information. This article is not intended
to be specific to any unique situation or individual vehicle configuration. The purpose of this Trouble Shooting information is to provide a list of common causes to problem symptoms. For model-specific Trouble Shooting, refer to SUBJECT, DIAGNOSTIC, or TESTING articles available in the section(s) you are accessing.
BASIC CLUTCH TROUBLE SHOOTING CHART
CONDITION
POSSIBLE CAUSE
CORRECTION
Incorrect clutch adjustment Adjust clutch
Chattering or Grabbing
Oil, grease or glaze on facings
Loose "U" joint flange
Worn input shaft spline Binding pressure plate Binding release lever Binding clutch disc hub
Unequal pressure plate contact
Loose/bent clutch disc
Incorrect transmission alignment
Worn pressure plate, disc or flywheel
Broken or weak pressure springs
Sticking clutch pedal
Incorrect clutch disc facing
Engine loose in chassis
Disassemble and clean or replace
See DRIVE AXLES article
Replace input shaft Replace pressure plate See CLUTCH article Replace clutch disc
Replace worn/misaligned components
Replace clutch disc Realign transmission
Replace damaged components
Replace pressure plate
Lubricate clutch pedal & linkage
Replace clutch disc
Tighten all mounting bolts
Failure to Release
Oil or grease on clutch facings
Incorrect release lever or pedal adjustment
Worn or broken clutch facings
Bent clutch disc or pressure plate
Clutch disc hub binding on input shaft
Binding pilot bearing
Sticking release bearing sleeve
Clean or replace clutch clutch disc
See CLUTCH article
Replace clutch disc
Replace damaged components
Clean or replace clutch disc and/or input shaft
Replace pilot bearing
Replace release bearing and/or sleeve
Binding clutch cable
See CLUTCH article
Defective clutch master Defective clutch slave Air in hydraulic system
Replace master cylinder Replace slave cylinder Bleed hydraulic system
Rattling
Weak or broken release lever spring
Damaged pressure plate Broken clutch return spring
Worn splines on clutch disc or input shaft
Worn clutch release bearing Dry or worn pilot bearing
Unequal release lever contact
Replace spring and check alignment
Replace pressure plate Replace return spring
Replace clutch disc and/or input shaft
Replace release bearing
Lubricate or replace pilot bearing
Align or replace release lever
Incorrect pedal free play
Warped or damaged clutch disc
Adjust free play
Replace damaged components
Slipping
Pressure springs worn or
Oily, greasy or worn facings
Release pressure plate
Clean or replace clutch disc
Incorrect clutch alignment Realign clutch assembly
Warped clutch disc or pressure plate
Binding release levers or clutch pedal
Replace damaged components
Lubricate and/or replace release components
Squeaking
Worn or damaged release
Dry or worn pilot or release bearing
Pilot bearing turning in crankshaft
Worn input shaft bearing
Incorrect transmission alignment
Dry release fork between pivot
Replace release bearing
Lubricate or replace assembly
Replace pilot bearing and/or crankshaft
Replace bearing and seal
Realign transmission
Lubricate release fork and pivot
Heavy and/or Stiff Pedal
Sticking release bearing sleeve
Replace release bearing and/or sleeve
Dry or binding clutch pedal hub
Floor mat interference with pedal
Dry or binding ball/fork pivots
Faulty clutch cable
Lubricate and align components
Lay mat flat in proper area
Lubricate and align components
Replace clutch cable
Noisy Clutch Pedal
Faulty interlock switch
Self-adjuster ratchet noise
Speed control interlock switch
Replace interlock switch
Lubricate or replace self-adjuster
Lubricate or replace interlock switch
Clutch Pedal Sticks Down
Binding clutch cable
See CLUTCH article
Springs weak in pressure plate
Binding in clutch linkage
Replace pressure plate
Lubricate and free linkage
Noisy
Dry release bearing
Dry or worn pilot bearing
Worn input shaft bearing
Lubricate or replace release bearing
Lubricate or replace bearing
Replace bearing
Transmission Click
Weak springs in pressure plate
Release fork loose on ball stud
Oil on clutch disc damper
Broken spring in slave cylinder
Replace pressure plate
Replace release fork and/or ball stud
Replace clutch disc Replace slave cylinder
DRIVE AXLE - NOISE DIAGNOSIS
Unrelated Noises
Some driveline trouble symptoms are also common to the engine, transmission, wheel bearings, tires, and other parts of the vehicle. Ensure cause of trouble actually is in the drive axle before adjusting, repairing, or replacing any of its parts.
Non-Drive Axle Noises
A few conditions can sound just like drive axle noise and have to be considered in pre-diagnosis. The 4 most common noises are exhaust, tires, CV/universal joints and wheel trim rings.
In certain conditions, the pitch of the exhaust gases may sound like gear whine. At other times, it may be mistaken for a wheel bearing rumble.
Tires, especially radial and snow, can have a high-pitched tread whine or roar, similar to gear noise. Also, some non-standard tires with an unusual tread construction may emit a roar or whine.
Defective CV/universal joints may cause clicking noises or excessive driveline play that can be improperly diagnosed as drive axle problems.
Trim and moldings also can cause a whistling or whining noise. Ensure none of these components are causing the noise before disassembling the drive axle.
Gear Noise
A "howling" or "whining" noise from the ring and pinion gear can be caused by an improper gear pattern, gear damage, or improper bearing preload. It can occur at various speeds and driving conditions, or it can be continuous.
Before disassembling axle to diagnose and correct gear noise, make sure that tires, exhaust, and vehicle trim have been checked as possible causes.
Chuckle
This is a particular rattling noise that sounds like a stick against the spokes of a spinning bicycle wheel. It occurs while decelerating from 40 MPH and usually can be heard until vehicle comes to a complete stop. The frequency varies with the speed of the vehicle.
A chuckle that occurs on the driving phase is usually caused by excessive clearance due to differential gear wear, or by a damaged tooth on the coast side of the pinion or ring gear. Even a very small tooth nick or a ridge on the edge of a gear tooth is enough the cause the noise.
This condition can be corrected simply by cleaning the gear tooth nick or ridge with a small grinding wheel. If either gear is damaged or scored badly, the gear set must be replaced. If metal has broken loose, the carrier and housing must be cleaned to remove particles that could cause damage.
Knock
This is very similar to a chuckle, though it may be louder, and occur on acceleration or deceleration. Knock can be caused by a gear tooth that is damaged on the drive side of the ring and pinion gears. Ring gear bolts that are hitting the carrier casting can cause knock. Knock can also be due to excessive end play in the axle shafts.
Clunk
Clunk is a metallic noise heard when an automatic
transmission is engaged in Reverse or Drive, or when throttle is applied or released. It is caused by backlash somewhere in the driveline, but not necessarily in the axle. To determine whether driveline clunk is caused by the axle, check the total axle backlash as follows:
Raise vehicle on a frame or twinpost hoist so that drive
wheels are free. Clamp a bar between axle companion flange and a part
of the frame or body so that flange cannot move.
On conventional drive axles, lock the left wheel to keep
it from turning. On all models, turn the right wheel slowly until it
is felt to be in Drive condition. Hold a chalk marker on side of tire
about 12" from center of wheel. Turn wheel in the opposite direction
until it is again felt to be in Drive condition.
Measure the length of the chalk mark, which is the total
axle backlash. If backlash is one inch or less, drive axle is not the source of clunk noise.
Bearing Whine
Bearing whine is a high-pitched sound similar to a whistle. It is usually caused by malfunctioning pinion bearings. Pinion bearings operate at drive shaft speed. Roller wheel bearings may whine in a similar manner if they run completely dry of lubricant. Bearing noise will occur at all driving speeds. This distinguishes it from gear whine, which usually comes and goes as speed changes.
Bearing Rumble
Bearing rumble sounds like marbles being tumbled. It is usually caused by a malfunctioning wheel bearing. The lower pitch is because the wheel bearing turns at only about 1/3 of drive shaft speed.
Chatter On Turns
This is a condition where the entire front or rear of vehicle vibrates when vehicle is moving. The vibration is plainly felt as well as heard. Extra differential thrust washers installed during axle repair can cause a condition of partial lock-up that creates this chatter.
Axle Shaft Noise
Axle shaft noise is similar to gear noise and pinion bearing whine. Axle shaft bearing noise will normally distinguish itself from gear noise by occurring in all driving modes (Drive, cruise, coast and float), and will persist with transmission in Neutral while vehicle is moving at problem speed.
If vehicle displays this noise condition, remove suspect axle shafts, replace wheel seals and install a new set of bearings. Re-evaluate vehicle for noise before removing any internal components.
Vibration
Vibration is a high-frequency trembling, shaking or grinding condition (felt or heard) that may be constant or variable in level and can occur during the total operating speed range of the vehicle.
The types of vibrations that can be felt in the vehicle can be divided into 3 main groups:
Vibrations of various unbalanced rotating parts of the
vehicle.
Resonance vibrations of the body and frame structures caused
by rotating of unbalanced parts.
Tip-in moans of resonance vibrations from stressed engine or
exhaust system mounts or driveline flexing modes.
DRIVE AXLE - RWD TROUBLE SHOOTING
NOTE: This is GENERAL information. This article is not intended
to be specific to any unique situation or individual vehicle configuration. The purpose of this Trouble Shooting information is to provide a list of common causes to problem symptoms. For model-specific Trouble Shooting, refer to SUBJECT, DIAGNOSTIC, or TESTING articles available in the section(s) you are accessing. For definitions of listed noises or sounds, see DRIVE AXLE - NOISE DIAGNOSIS under POWERTRAIN.
DRIVE AXLE (RWD) TROUBLE SHOOTING
CONDITION POSSIBLE CAUSE CORRECTION
Knocking or Clunking
Differential Side Gear Clearance
Worn Pinion Shaft Axle Shaft End Play Missing Gear Teeth
Wrong Axle Backlash Misaligned Driveline
Check Clearance Replace Pinion Shaft Check End Play
Check Differential/ Replace Gear
Check Backlash Realign Driveline
Clinking During Engagement
Side Gear Clearance
Ring and Pinion Backlash Worn/Loose Pinion Shaft Bad "U" Joint Sticking Slip Yoke Broken Rear Axle Mount Loose Drive Shaft Flange
Check Clearance Check Backlash Replace Shaft/Bearing Replace "U" Joint Lube Slip Yoke Replace Mount Check Flange
Click/Chatter On Turns
Differential Side Gear Clearance
Wrong Turn On Plates (1)
Wrong Differential Lubricant (1)
Check Clearance Replace Clutch Plates
Change Lubricant
Knock Or Click
Flat Spot on Rear Wheel Bearing
Replace Wheel Bearing
Low Vibration At All Speeds
Faulty Wheel Bearing
Faulty "U" Joint Faulty Drive Shaft Faulty Companion Flange Faulty Slip Yoke Flange (1) - Limited slip differential only.
Replace Wheel Bearing Replace "U" Joint Balance Drive Shaft Replace Flange Replace Flange
FWD AXLE SHAFTS & CV JOINTS TROUBLE SHOOTING
NOTE: This is GENERAL information. This article is not intended
to be specific to any unique situation or individual vehicle configuration. The purpose of this Trouble Shooting information is to provide a list of common causes to
problem symptoms. For model-specific Trouble Shooting, refer to SUBJECT, DIAGNOSTIC, or TESTING articles available in the section(s) you are accessing.
BASIC FWD AXLE SHAFTS & CV JOINTS TROUBLE SHOOTING CHART
CONDITION
POSSIBLE CAUSE
Grease Leaks
CV boot torn or cracked
Clicking Noise on Cornering
Damaged outer CV
Clunk Noise on Acceleration
Damaged inner CV
Vibration or Shudder on Acceleration
Sticking, damaged or worn CV Misalignment or spring height
STEERING & SUSPENSION
MANUAL STEERING GEAR TROUBLE SHOOTING
NOTE: This is GENERAL information. This article is not intended
to be specific to any unique situation or individual vehicle configuration. The purpose of this Trouble Shooting information is to provide a list of common causes to problem symptoms. For model-specific Trouble Shooting, refer to SUBJECT, DIAGNOSTIC, or TESTING articles available in the section(s) you are accessing.
BASIC MANUAL STEERING GEAR TROUBLE SHOOTING CHART
CONDITION
POSSIBLE CAUSE
CORRECTION
Rattle or Chucking Noise in Rack and Pinion
Rack and pinion mounting bracket loose
Lack of/or incorrect lubricant
Tighten all mounting bolts
Correct as necessary
Steering gear mounting bolts loose
Tighten all mounting bolts
Excessive Play
Front wheel bearing improperly adjusted
Loose or worn steering linkage
Loose or worn steering gear shift
Steering arm loose on gear shaft
Steering gear housing bolts loose
Steering gear adjustment too loose
See FRONT SUSPENSION article
See STEERING LINKAGE article
See MANUAL STEERING GEAR article
See MANUAL STEERING GEAR article
Tighten all mounting bolts
See MANUAL STEERING GEAR article
Steering arms loose on
Tighten and check
knuckles
steering linkage
Rack and pinion mounting loose
Rack and pinion out of adjustment
Tie rod end loose
Excessive Pitman shaft-to-ball nut lash
Tighten all mounting bolts
See adjustment in STEERING article
Tighten and check steering linkage
Repair as necessary
Poor Returnability
Lack of lubricant in ball joint or linkage
Binding in linkage or ball joints
Improper front end alignment
Improper tire pressure
Tie rod binding
Shaft seal rubbing shaft
Lubricate and service systems
See STEERING LINKAGE and SUSPENSION article
See WHEEL ALIGNMENT article
Inflate to proper pressure
Inflate to proper pressure
See STEERING COLUMN article
Excessive Vertical Motion
Improper tire pressure
Tires, wheels or rotors out of balance
Worn or faulty shock absorbers
Loose tie rod ends or steering
Loose or worn wheel bearings
Inflate to proper pressure
Balance tires then check wheels and rotors
Check and replace if necessary
Tighten or replace if necessary
See SUSPENSION article
Steering Pulls to One Side
Improper tire pressure
Front tires are different sizes
Wheel bearings not adjusted properly
Bent or broken suspension components
Improper wheel alignment
Inflate to proper pressure
Rotate or replace if necessary
See FRONT SUSPENSION article
See FRONT SUSPENSION article
See WHEEL ALIGNMENT article
Brakes dragging
See BRAKES article
Instability
Low or uneven tire pressure
Loose or worn wheel bearings
Loose or worn idler arm bushing
Loose or worn strut bushings
Incorrect front wheel alignment
Steering gear not centered
Springs or shock
Improper cross shaft
Inflate to proper pressure
See FRONT SUSPENSION article
See FRONT SUSPENSION article
See FRONT SUSPENSION article
See WHEEL ALIGNMENT article
See MANUAL STEERING GEARS article
Check and replace if necessary
See MANUAL STEERING GEARS article
POWER STEERING TROUBLE SHOOTING
NOTE: This is GENERAL information. This article is not intended
to be specific to any unique situation or individual vehicle configuration. The purpose of this Trouble Shooting information is to provide a list of common causes to problem symptoms. For model-specific Trouble Shooting, refer to SUBJECT, DIAGNOSTIC, or TESTING articles available in the section(s) you are accessing.
BASIC POWER STEERING TROUBLE SHOOTING CHART
CONDITION
POSSIBLE CAUSE
CORRECTION
Rattle or Chucking Noise
Pressure hoses touching engine parts
Loose Pitman shaft
Tie rods ends or Pitman arm loose
Rack and pinion mounts loose
Free play in worm and
Adjust to proper clearance
Adjust or replace if necessary
Tighten and check system
Tighten all mounting bolts
See POWER STEERING GEAR article
Loose sector shaft or thrust bearing adjustment
Free play in pot coupling
See POWER STEERING GEAR
See STEERING COLUMN article
Worn shaft serrations
See STEERING COLUMN article
Growl in Steering Pump
Excessive pressure in hoses
Restricted hoses, see POWER STEERING GEAR article
Scored pressure plates
See POWER STEERING GEAR article
Scored thrust plates or rotor
See POWER STEERING GEAR article
Extreme wear of cam ring
See POWER STEERING GEAR article
Rattle in Steering Pump
Vanes not installed
Vanes sticking in rotor
See POWER STEERING PUMP article
See POWER STEERING PUMP article
Swish noise in Pump
Defective flow control valve
See POWER STEERING PUMP article
Groan in Steering Pump
Air in fluid
Poor pressure hose connection
See POWER STEERING PUMP article
Tighten and check, replace if necessary
Squawk When Turning
Damper "O" ring on valve spool cut
See POWER STEERING PUMP article
Moan or Whine in Pump
Pump shaft bearing scored
Air in fluid or fluid level low
Replace bearing and fluid
See POWER STEERING PUMP article
Hose or column grounded
Cover "O" ring missing or damaged
Valve cover baffle missing or damaged
Interference of components in pump
Loose or poor bracket alignment
Check and replace if necessary
See POWER STEERING PUMP article
See POWER STEERING PUMP article
See POWER STEERING PUMP article
Correct or replace if necessary
Hissing When Parking
Internal leakage in steering gear
Check valved assembly first
Chirp in Steering Pump
Loose or worn power steering belt
Adjust or replace if necessary
Buzzing When Not Steering
Noisy pump
See POWER STEERING PUMP article
Free play in steering shaft bearing
Bearing loose on shaft serrations
See STEERING COLUMN article
See STEERING COLUMN article
Clicking Noise in Pump
Pump slippers too long
Broken slipper springs
See POWER STEERING PUMP article
See POWER STEERING PUMP article
Excessive wear or nicked rotors
Damaged cam contour
See POWER STEERING PUMP article
See POWER STEERING PUMP article
Poor Return of Wheel
Wheel rubbing against turn signal
Flange rubbing steering gear adjuster
Tight or frozen steering shaft bearing
Steering gear out of adjustment
Sticking or plugged spool valve
Improper front end alignment
Wheel bearings worn or loose
Ties rods or ball joints binding
Intermediate shaft joints binding
Kinked pressure hoses
Loose housing head spanner nut
Damaged valve lever
Sector shaft adjusted too tight
Worm thrust bearing adjusted too tight
Reaction ring sticking in cylinder
See STEERING COLUMN SWITCHES article
See STEERING COLUMN article
See STEERING COLUMN article
See POWER STEERING GEAR article
See POWER STEERING PUMP article
See WHEEL ALIGNMENT article
See FRONT SUSPENSION article
Check and replace if necessary
See STEERING COLUMN article
Correct or replace if necessary
See POWER STEERING GEAR article
See POWER STEERING GEAR article
See ADJUSTMENTS in POWER STEERING GEAR article
See ADJUSTMENTS in POWER STEERING GEAR article
See POWER STEERING GEAR article
Reaction ring sticking in housing head
Steering pump internal leakage
Steering gear-to-column misalignment
Lack of lubrication in linkage
Lack of lubrication in ball joints
See POWER STEERING GEAR article
See POWER STEERING PUMP article
See STEERING COLUMN article
Service front suspension
Service front suspension
Increased Effort When Turning Wheel Fast Foaming, Milky Power Steering Fluid, Low Fluid Level or Low Pressure
Wheel Surges or Jerks
High internal pump leakage
Power steering pump belt slipping
Low fluid level
Engine idle speed to low
Air in pump fluid system
Pump output low
Steering gear malfunctioning
Low fluid level Loose fan belt
Insufficient pump pressure
Sticky flow control valve
Linkage hitting oil pan at full turn
See POWER STEERING PUMP
article
Adjust or replace if
necessary
Check and fill to proper level
Adjust to correct setting
See POWER STEERING PUMP article
See POWER STEERING PUMP article
See POWER STEERING GEAR article
Check and fill to proper level
Adjust or replace if necessary
See POWER STEERING PUMP article
See POWER STEERING PUMP article
Replace bent components
Kick Back or Free Play
Air in pump fluid system
Worn poppet valve in steering gear
Excessive over center lash
Thrust bearing out of adjustment
See POWER STEERING PUMP article
See POWER STEERING PUMP article
See POWER STEERING GEAR article
See POWER STEERING GEAR article
Free play in pot coupling
Steering gear coupling loose on shaft
Steering disc mounting bolts loose
Coupling loose on worm shaft
Improper sector shaft adjustment
Excessive worm piston side play
Damaged valve lever
See POWER STEERING PUMP article
See POWER STEERING PUMP article
Tighten or replace if necessary
Tighten or replace if necessary
See POWER STEERING GEAR article
See POWER STEERING GEAR article
See POWER STEERING GEAR article
Universal joint loose
Defective rotary valve
Tighten or replace if necessary
See POWER STEERING GEAR article
No Power When Parking
Sticking flow control valve
Insufficient pump pressure output
Excessive internal pump leakage
Excessive internal gear leakage
Flange rubs against gear adjust plug
Loose pump belt
Low fluid level
See POWER STEERING PUMP article
See POWER STEERING PUMP article
See POWER STEERING PUMP article
See POWER STEERING PUMP article
See STEERING COLUMN article
Adjust or replace if necessary
Check and add proper amount of fluid
Engine idle too low
Steering gear-to-column misaligned
Adjust to correct setting
See STEERING COLUMN article
No Power, Left Turn
Left turn reaction seal "O" ring worn
Left turn reaction seal damaged/missing
Cylinder head "O" ring damaged
See POWER STEERING GEAR article
See POWER STEERING GEAR article
See POWER STEERING PUMP article
No Power, Right Turns
Column pot coupling bottomed
Right turn reaction seal "O" ring worn
Right turn reaction seal damaged
Internal leakage through piston end plug
Internal leakage through side plugs
See STEERING COLUMN article
See POWER STEERING GEAR article
See POWER STEERING GEAR article
See POWER STEERING GEAR article
See POWER STEERING GEAR article
Lack of Effort in Turning
Left and/or right reaction seal sticking in cylinder head
Replace, see POWER STEERING GEAR article
Wanders to One Side
Front end alignment incorrect
Unbalanced steering gear valve
See WHEEL ALIGNMENT article
See POWER STEERING GEAR article
Low Pressure Due to Steering Pump
Flow control valve stuck or inoperative
Pressure plate not flat against cam ring
Extreme wear of cam ring
Scored plate, thrust plate or rotor
Vanes not installed properly
Vanes sticking in rotor slots
Cracked/broken thrust or pressure plate
See POWER STEERING PUMP article
See POWER STEERING PUMP article
Replace and check adjustments
See POWER STEERING PUMP article
See POWER STEERING PUMP article
See POWER STEERING PUMP article
See POWER STEERING PUMP article
STEERING COLUMN TROUBLE SHOOTING
NOTE: This is GENERAL information. This article is not intended
to be specific to any unique situation or individual vehicle configuration. The purpose of this Trouble Shooting information is to provide a list of common causes to problem symptoms. For model-specific Trouble Shooting, refer to SUBJECT, DIAGNOSTIC, or TESTING articles available in the section(s) you are accessing.
BASIC STEERING COLUMN TROUBLE SHOOTING CHART
CONDITION
POSSIBLE CAUSE
CORRECTION
Noise in Steering
Coupling pulled apart
See STEERING COLUMNS article
Column not correctly aligned
Broken lower joint Horn contact ring not
Bearing not lubricated
Shaft snap ring not properly seated
Plastic spherical joint not lubricated
Shroud or housing loose
Lock plate retaining ring not seated
Loose sight shield
See STEERING COLUMNS article
Replace joint
See STEERING COLUMN article
See STEERING COLUMN article
Reseat or replace snap ring
See STEERING COLUMN article
Tighten holding screws
See STEERING COLUMN article
Tighten holding screws
High Steering Shaft Effort
Column assembly misaligned
Improperly installed dust shield
Tight steering universal joint
See STEERING COLUMN article
Adjust or replace
See STEERING COLUMN article
High Shift Effort
Column is out of alignment
Improperly installed dust shield
See STEERING COLUMN article
Adjust or replace
Seals or bearings not lubricated
Mounting bracket screws too long
Burrs on shift tube
Lower bowl bearing assembled wrong
See STEERING COLUMNS article
Replace with new shorter screws
Remove burrs or replace tube
See STEERING COLUMN article
Shift tube bent or broken Replace as necessary
Improper adjustment of shift levers
See STEERING COLUMN article
Improper Trans. Shifting
Sheared shift tube joint Sheared lower shaft lever
Improper shift lever adjustment
Replace as necessary Replace as necessary
See STEERING COLUMN article
Improper gate plate adjustment
See STEERING COLUMN article
Excess Play in Column
Instrument panel bracket bolts loose
Tighten bolts and check bracket
Broken weld nut on jacket See STEERING COLUMN
article
Instrument bracket capsule See STEERING COLUMN
sheared article
Column bracket/jacket bolts loose
Tighten bolts and check bracket
Steering Locks in Gear
Release lever mechanism
See STEERING COLUMN article
SUSPENSION TROUBLE SHOOTING
NOTE: This is GENERAL information. This article is not intended
to be specific to any unique situation or individual vehicle configuration. The purpose of this Trouble Shooting information is to provide a list of common causes to problem symptoms. For model-specific Trouble Shooting, refer to SUBJECT, DIAGNOSTIC, or TESTING articles available in the section(s) you are accessing.
BASIC SUSPENSION TROUBLE SHOOTING CHART
CONDITION
POSSIBLE CAUSE
CORRECTION
Front End Noise
Loose or worn wheel
Worn shocks or shock mountings
Worn struts or strut mountings
Loose or worn lower control arm
Loose steering gear-to-frame bolts
Worn control arm bushings Ball joints not lubricated
See Wheel Bearing Adjustment in SUSPENSION
Replace struts or strut mountings
Replace struts or strut mountings
See SUSPENSION
See STEERING
See SUSPENSION
Lubricate ball joints & see Ball Joint Checking in SUSPENSION
Front Wheel Shake, Shimmy, or Vibration
Tires or wheels out of balance
Incorrect wheel alignment Drive shaft unbalanced
Check tire balance
See WHEEL ALIGNMENT
Check drive shaft balance
Car Pulls to One Side
Loose or worn wheel bearings
Loose or worn tie rod ends Worn upper ball joints
Worn shock absorbers Worn strut bushings
Mismatched or uneven tires Broken or sagging springs
Loose or worn strut bushings
Improper wheel alignment
Improper rear axle alignment
Power steering gear unbalanced
Front brakes dragging
See WHEEL ALIGNMENT
See SUSPENSION
See Ball Joint Checking in SUSPENSION
Replace shock absorbers Replace strut bushings
Check tire condition See SUSPENSION See SUSPENSION
See WHEEL ALIGNMENT
Check rear axle alignment
See STEERING See BRAKES
Abnormal Tire Wear
Unbalanced tires
Sagging or broken springs
Incorrect front end alignment
Faulty shock absorbers
Check tire balance & rotation
See SUSPENSION
See WHEEL ALIGNMENT
Replace chock absorbers
Scuffed Tires
Toe-In incorrect
Suspension arm bent or twisted
See WHEEL ALIGNMENT
See appropriate SUSPENSION article
Springs Bottom or Sag
Bent or broken springs
Leaking or worn shock absorbers
Frame misalignment
See SUSPENSION
Replace shock absorbers
Check frame for damage
Spring Noises
Loose "U" Bolts
Loose or worn bushings
Worn or missing interliners
See SUSPENSION See SUSPENSION See SUSPENSION
Shock Absorber Noise
Loose shock mountings
Check & tighten mountings
Worn bushings
Replace bushings
Air in system Undercoating on shocks
Bleed air from system Remove undercoating
Car Leans or Loose stabilizer bar Sways on Corners
Faulty shocks or mountings
Broken or sagging springs
See SUSPENSION
Replace shocks or mountings
See SUSPENSION
Shock Absorbers Leaking
Worn seals or reservoir tube crimped
See SUSPENSION
Broken Springs
Loose "U" bolts Inoperative shock absorbers
See SUSPENSION
Replace shock absorbers
WHEEL ALIGNMENT TROUBLE SHOOTING
NOTE: This is GENERAL information. This article is not intended
to be specific to any unique situation or individual vehicle configuration. The purpose of this Trouble Shooting information is to provide a list of common causes to problem symptoms. For model-specific Trouble Shooting, refer to SUBJECT, DIAGNOSTIC, or TESTING articles available in the section(s) you are accessing.
BASIC WHEEL ALIGNMENT TROUBLE SHOOTING CHART
CONDITION
POSSIBLE CAUSE
CORRECTION
Premature Tire Wear
Pulls to One Side
Improper tire inflation
Front alignment out of tolerance
Suspension components worn
Steering system components worn
Improper standing height Uneven or sagging springs Bent wheel
Improper torsion bar adjustment
Loose or worn wheel bearings
Worn or defective shock Tires out of balance
Improper tire inflation Brake dragging
Check tire pressure
See ALIGNMENT SPECS in WHEEL ALIGNMENT section
See SUSPENSION section See STEERING section
See WHEEL ALIGNMENT See SUSPENSION section See WHEEL ALIGNMENT See SUSPENSION section
See WHEEL BEARING ADJ. in SUSPENSION section
Replace shock absorbers Check tire balance
Check tire pressure See BRAKE section
Mismatched tires
Broken or sagging spring
Broken torsion bar
Power steering valve not centered
Front alignment out of tolerance
Defective wheel bearing
Uneven sway bar links Frame bent
Steering system bushing worn
See WHEEL ALIGNMENT
See SUSPENSION section
See SUSPENSION section
See STEERING section
See WHEEL ALIGNMENT section
See WHEEL BEARINGS in SUSPENSION section
See SUSPENSION section Check for frame damage See STEERING section
Hard Steering
Idler arm bushing too tight
Ball joint tight or seized Steering linkage too tight
Power steering fluid low
Power steering drive belt loose
Power steering pump defective
Steering gear out of adjustment
Incorrect wheel alignment Damaged steering gear Damaged suspension
Bent steering knuckle or supports
See STEERING LINKAGE in STEERING section
See SUSPENSION section
See STEERING LINKAGE in STEERING section
Add proper amount of fluid
See STEERING section
See STEERING section
See STEERING section
See WHEEL ALIGNMENT
See STEERING section
See SUSPENSION section
See SUSPENSION section
Vehicle "Wanders"
Strut rod or control arm bushing worn
Loose or worn wheel bearings
Improper tire inflation
Stabilizer bar missing or defective
See SUSPENSION section
See WHEEL BEARINGS in SUSPENSION section
Check tire pressure See SUSPENSION section
Wheel alignment out of tolerance
Broken spring
Defective shock absorbers
Worn steering & suspension components
See Adjustment in WHEEL ALIGNMENT section
See SUSPENSION section Replace shock absorbers See SUSPENSION section
Front End Shimmy Tire out of balance/round Excessive wheel runout
Insufficient or improper caster
Worn suspension or steering components
Defective shock absorbers
Wheel bearings worn or loose
Power steering reaction Bracket loose
Steering gear box (rack) mounting loose
Steering gear adjustment loose
Worn spherical joints
Toe-In Not Adjustable
Lower control arm bent Frame bent
Camber Not Adjustable
Control arm bent Frame bent
Hub & bearing not seated properly
Check tire balance See WHEEL ALIGNMENT
See WHEEL ALIGNMENT section
See SUSPENSION section
Replace shock absorber
See WHEEL BEARING ADJ. in SUSPENSION section
See STEERING section See STEERING section See STEERING section See SUSPENSION section
See SUSPENSION section Check frame for damage
See SUSPENSION section Check frame for damage See SUSPENSION section